You are using an out of date browser. It may not display this or other websites correctly.
You should upgrade or use an alternative browser.
You should upgrade or use an alternative browser.
Meet Gertie the rotten 72 lowlight crossover :)
- Thread starter exuptoy
- Start date


Help Support Early Bay Forum:
This site may earn a commission from merchant affiliate
links, including eBay, Amazon, and others.
:lol:
Honestly mate I found it on the bay for £90 used (it hadn't had any use and the guy who was selling it reckoned he didn't have a blue plug to try it) I reckoned at the time it was nicked but an ebay sale is an ebay sale and all that. It is only a cheap Cut40 from China.
I needed it to do this when I bought the rear cut!

I have changed the properties of the pics of todays work on the Postimg upload. I'll have to do the rest of my pics though which may take a bit longer.
Honestly mate I found it on the bay for £90 used (it hadn't had any use and the guy who was selling it reckoned he didn't have a blue plug to try it) I reckoned at the time it was nicked but an ebay sale is an ebay sale and all that. It is only a cheap Cut40 from China.
I needed it to do this when I bought the rear cut!
I have changed the properties of the pics of todays work on the Postimg upload. I'll have to do the rest of my pics though which may take a bit longer.
Lucky bugger - sounds like a bargain.
I had to do all my cuts using either a dremmel or my air cutter (for really tight spaces) or just the plain grinder with 1mm thick cutting disks.
Picture above works as I can now make it bigger so cheers.
I had to do all my cuts using either a dremmel or my air cutter (for really tight spaces) or just the plain grinder with 1mm thick cutting disks.
Picture above works as I can now make it bigger so cheers.
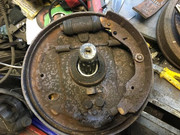
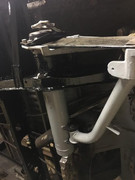
Decided to remove the rear hub assy and clean & paint some bits. Already looking better but loads to do. Once the last section of chassis is done I can concentrate on the beam then.

Inside of the drum looking a bit tired though. Need to order some bits.

Inside of the drum looking a bit tired though. Need to order some bits.
Stripped off the drive shaft and back plate earlier and found a tub of Bilthamber Deox C I had purchased when I had the Mini but forgot about.
This stuff mixes 1 part powder to 19 parts warm water and just leave your rusty bits to soak overnight. For bad rust you can do 1:4.
I decided to drop in a load of bits like the brake seperators and bolts etc along with the hub assy and only half the back plate to see the difference. I'll do the other half tomorrow along with the drum. I also stuck in the rear shoe backing plates but only submerged half as a comparison.

This was only after 1 hour in the solution and no rust agitation!

This was after a flash over with the wire wheel!

Best thing is you can save the solution a keep reusing it until it turns black!
My stuff is back in the bucket until tomorrow.
This stuff mixes 1 part powder to 19 parts warm water and just leave your rusty bits to soak overnight. For bad rust you can do 1:4.
I decided to drop in a load of bits like the brake seperators and bolts etc along with the hub assy and only half the back plate to see the difference. I'll do the other half tomorrow along with the drum. I also stuck in the rear shoe backing plates but only submerged half as a comparison.
This was only after 1 hour in the solution and no rust agitation!
This was after a flash over with the wire wheel!
Best thing is you can save the solution a keep reusing it until it turns black!
My stuff is back in the bucket until tomorrow.
Got my tubs emptied and cleaned off. Happy enough but it's not the most amazing outcome. Cleaned off the back plate and stuck it in the solution for another evening, it also needs a repair. I may get a new part yet. Be a shame to spoil an otherwise nice job. We'll see.


Brake arms look ok and once given a coat of satin black will be ok.

Hub looks ok and wil be fine once it's had some paint.

Bolts cleaned up pretty well. Look at my flower pot underneath, no coating left on it!!!

Remember that brake shoe?

Brake arms look ok and once given a coat of satin black will be ok.
Hub looks ok and wil be fine once it's had some paint.
Bolts cleaned up pretty well. Look at my flower pot underneath, no coating left on it!!!
Remember that brake shoe?
That's the way Andy, keep talking, you might just save me £50 for a new back plate as I was seriously thinking of buying one. I'll see how it looks after another night in the solution before ruling it out. I don't mind carrying out a repair that's easy enough.
A spare hour or so saw me wash off the back plate and give it a coat of Kurust, also etch primed the brake bar and handbrake arm and hub centre and gave them a coat of satin black. Gonna carry out the repair on the back plate tomorrow and hopefully give it all a coat of Epoxy 121 whilst I await the brake parts from Machine 7.


")
Andy mate, you and the rest of the guys on here give others like me a real push to get the work done just by carrying out your own work and cajoling lazy b******s like me to work to the best of my ability. I started reading your build thread last night on night shift and have so far got to page 34 around mid 2015 and I am amazed at the work you have done. So, yeah, I am copying you and many others who really inspire me.
I take my hat off to you all.
Thanks
Lyn
This mornings work was repairing the back plate. Sorta wish I'd sprayed the Epoxy instead of brushing it. Too late now.


This afternoon I made a start on the remaining chassis repairs, a little more to do and it should be ready for the torsion tube gusset plates.


This afternoon I made a start on the remaining chassis repairs, a little more to do and it should be ready for the torsion tube gusset plates.
Cheers dude.
So, after my last update the wife said she was off out with the daughters so I went back up the man cave and finished off. Then I painted half the torsion tube with Rustoleum. Aside from a couple of fillers around the torsion tube to strengthen up the chassis I think all underside welding is done. Still lots to do under there before it goes back on its wheels though.


Not pretty but functional and I've saved 50 quid in the process. Anyway who's gonna see it once it's fitted!

Almost there.


So, after my last update the wife said she was off out with the daughters so I went back up the man cave and finished off. Then I painted half the torsion tube with Rustoleum. Aside from a couple of fillers around the torsion tube to strengthen up the chassis I think all underside welding is done. Still lots to do under there before it goes back on its wheels though.
Not pretty but functional and I've saved 50 quid in the process. Anyway who's gonna see it once it's fitted!
Almost there.

graysummers
Well-known member
- Joined
- Jun 16, 2009
- Messages
- 470
- Reaction score
- 15
- Year of Your Van(s)
- 1972
- Van Type
- Crossover
Really glad you’ve carried on. Great to see the pics of progress. Have you seen the website http://www.partsemporium.co.uk/index.htm . Never dealt with the gentleman but he has a lot of bits and bobs.
Got home from work to a parcel from Machine7. Couldn't resist seeing how things looked and ended up building the backplate up. The only thing I have forgotten is the step which is missing from the backplate. Anyone know the reason for its inclusion? Do I need to Spot weld it back behind the handbrake cable? You can see it in the original install.
Also how does the little spring steel attachment for the adjusters sit on the back of the adjuster block?

Still need to paint the hub and replace the bearings.
Also how does the little spring steel attachment for the adjusters sit on the back of the adjuster block?
Still need to paint the hub and replace the bearings.
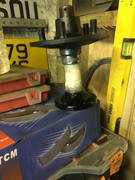
A long day today. Stripped the bearings from the rear hub, pressure washed and de-greased it then gave it a coat of Rustoleum along with the new torsion bar end cap.

Flicked some satin black over the drive shaft stub.
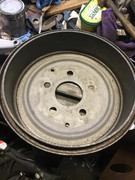
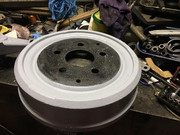
Got my 1kg package of Citric Acid (£5.49 delivered), mixed half of it with 10L of warm water in a builders bucket and after running a flap wheel over the very rusty rear drum and stuck it in the solution along with a fish tank heater, as the CA works better with warm water, then lifted it out after about 2 hours to agitate the rust then stuck it back in for another 2 hours with a fresh sprinkle of CA to top up the solution. Totally amazed and every bit as good as the Bilthamber Deox-C which is essentially CA and over 3 times the price!

Look at the result!


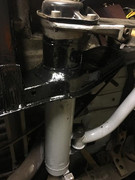
I've left it soaking in Kurust until the morning before it gets a coat of paint. Next up was fabricating and welding on the fillet around the torsion bar to strengthen an otherwise known weak point. Gave it a good coat of paint after. Still need to swap over the end cap once it dries so used the new one for the other side with new rubber doughnuts.
Flicked some satin black over the drive shaft stub.
Got my 1kg package of Citric Acid (£5.49 delivered), mixed half of it with 10L of warm water in a builders bucket and after running a flap wheel over the very rusty rear drum and stuck it in the solution along with a fish tank heater, as the CA works better with warm water, then lifted it out after about 2 hours to agitate the rust then stuck it back in for another 2 hours with a fresh sprinkle of CA to top up the solution. Totally amazed and every bit as good as the Bilthamber Deox-C which is essentially CA and over 3 times the price!
Look at the result!
I've left it soaking in Kurust until the morning before it gets a coat of paint. Next up was fabricating and welding on the fillet around the torsion bar to strengthen an otherwise known weak point. Gave it a good coat of paint after. Still need to swap over the end cap once it dries so used the new one for the other side with new rubber doughnuts.
Similar threads
Vehicle For Sale
Early Bay Deluxe 1971
- Replies
- 5
- Views
- 1K
- Locked
- Replies
- 1
- Views
- 1K
- Replies
- 59
- Views
- 10K
- Replies
- 4
- Views
- 3K