Restoring Mollie (69 Bay) 500+ Photos

Early Bay Forum

Help Support Early Bay Forum:

This site may earn a commission from merchant affiliate links, including eBay, Amazon, and others.
Still soaking that fookin cover (will give it a last go tomorrow before the disc cutter comes out!) Had a good day, not many pics and doesn't look like much done but...

After 6months? 8 maybe
Yfe6m.jpg


It's out! woohoo :D got the floor out and those fookin bellypans off. not looking too healthy, but hopefully most of the rust will bruch away!

Thinking I should maybe advertise this as Used Old Stock ;)
a0fYF.jpg


See what tomorrow brings. Could be cutting that cover off? cleaning up the chassis? replacing tophat? may even break out the welder for the first time on Mollie :shock:
 
Looks like progress Nick - daunting maybe, but good progress!!! Is there anything holding it all together???

I suggest you get the welder out. Get some practice in before my floor pans ;-)

Cheers,
Nick
 
A bit more done today.

Chopping out front tophat...
WZTLF.jpg


jqvJC.jpg


4ZIp5.jpg


Need to know how to remove the gear change link tube thing! see Here

Front Crossmember look decidely thin and riddled with tin worm!
6YEQ8.jpg


I don't like the quality of the repro tophats (see Here) so have been on the phone to Carl at Autocraft today as and it looks like the Split ones are the same dimensions as the Early Bay so quality Autocraft tophats on order :D
 
Just re-read your post from the start (you posted on mine), your one of the ones i read up on so i know what i'm doing along the way. A bit braver than me though i just replaced the ends of the top hats as i wasnt confident at cutting my whole florr out :lol:

Keep up the good work :)
 
Nugsy said:
your one of the ones i read up on so i know what i'm doing along the way.

:oops: That's a first! I'm making it up as I go along. One man's logic and all that! Just trying to make sure it's all going to be solid and safe, rather chop it out and replace than think it all looks lovely behind years of P.O. paint and bodge's. Working on the principle that if it can be put together, then it can be taken apart and remade. Just spending too much time working out which bit needs to go in first!

Cheers, Nick (P.S. keep at it with yours :) )
 
Had a good couple of days cleaning bits up, No pics though, sorry for those who are watching, but doesn't seem much point taking pics of cleaning up where belly pans were or scraping off rust and old underseal.

I think (well I know) that someone has already had this beauty stripped underneath as everything was sprayed with red oxide and then underseal. Trouble is, nothing was etched or keyed in as the whole lot is just flaking off. Makes cleaning up a little easier, if not pretty messy.

Hopefully the Autocraft Tophats arrive today so I can start measuring up. and shortening one for the one under the front bulkhead. Still got to get the heater tube out (although that's nearly there) and once that's out can carefully grind the welds back that are holding the gear linkage tube in so that can come out as well. Also got front and rear crossmembers coming but I promised Carl at Autocraft that I'd get the old ones out in one piece so he can use them as a pattern. Unstitching them is proving more time consuming, but hopefully worth it in the end :)

Maybe another update later (with pics :) )

Thanks for all comments and encouragement. better than redbull :D
 
3 weeks! time goes too quickly and not enough gets done!

So, got the rear crossmember out in almost 1 piece. That'll be winging its way to Karl at Autocraft later this week once I've got the remnants of the front one off as well! Just for info, the Autocraft front crossmembers are almost identical, just two small mods to line the cable tubes up and should be good to go. The rear ones aren't anywhere near. Far too short so hopefully Karl will be able to reproduce these. Their panels are really good, good value, clean lines, excellent fit.
Gzb6g.jpg


Gear link tube out. For reference, they are "blob" welded at as it passes through the front tophat at the front, at the bottom of the two I beams and at the bottom inside of the tophat with the seat belt mounts, then the last one is at rear of final tophat! While it's out I'll replace the two bushes in the tube.
q9ioB.jpg


Heater tube came out OK. They are stitch welded where the Y tube joins the tube at the back, 2 small stitch / blob welds at the back of the rear crossmember, at the bottom of the tube where it slides into the slightly larger tube between the front I beam and the front crossmember, and finally 3 stitch weld at the front of the front crossmember. You can then slide the tube forward into the slightly larger one and out of the rear crossmember then drop it and pull it free. The bigger front tube then slides out of the front crossmember. Hopefully this will work in reverse when putting it all back together! Anyway! enough rambling.

So the front crossmember is also out (well almost, just got the bit where the brake pipe tube is welded to it). Should be 30 mins or so and that's out so I can clean up and pack it up with the rear one and post it off to Autocraft.
l87iK.jpg


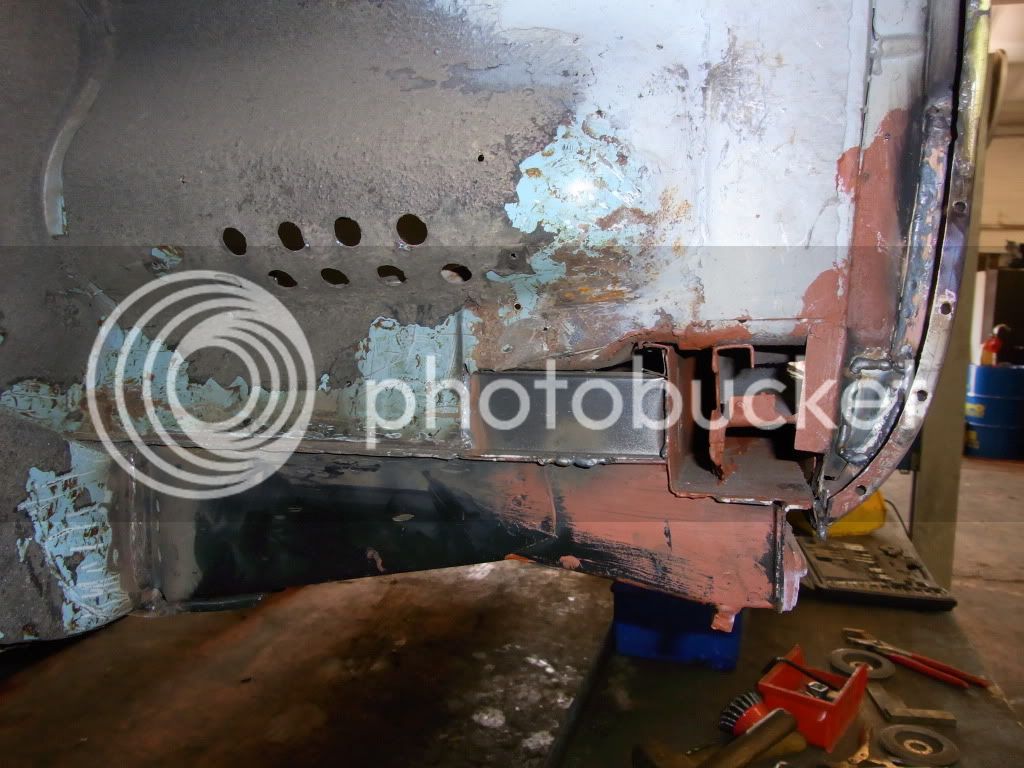
Sacrilege! cut down a perfectly good Autocraft tophat from 1470mm to 1364mm for the front tophat that sits over the front crossmember and where the rear panel of the front arch closes off
0uR8p.jpg


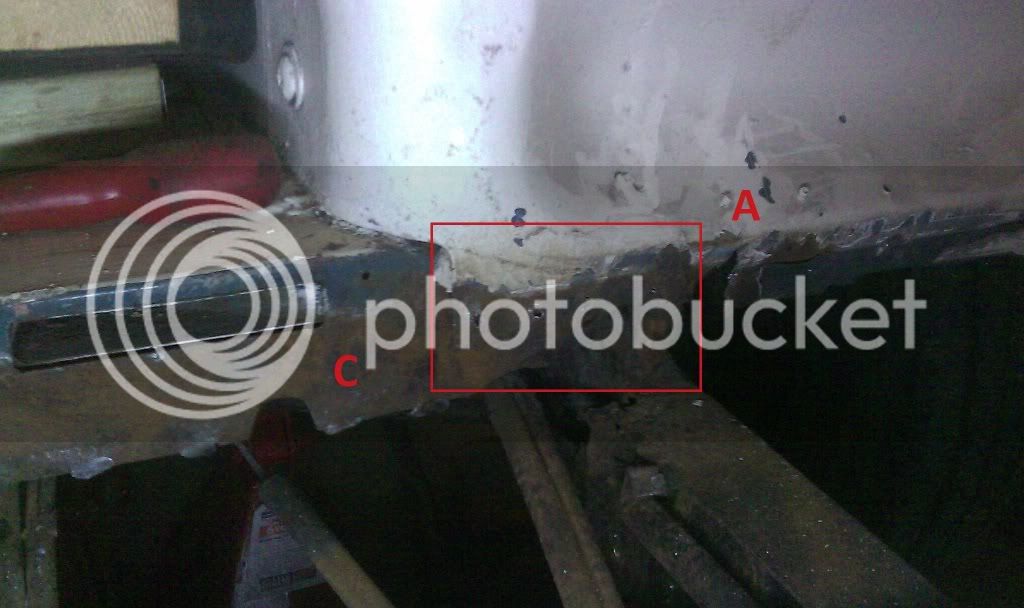
Got a small dilema with the closing plate at the rear of the front arch. I've drawn a red line where I think the original metal line would have followed. I've searched most of the resto's on here to see what it should look like but can't find any so if anyone has a pic of this area that's all original please let me know :)
gtO3a.jpg


If it is the line I think it is (as drawn above) I may stitch in the repair panels before fitting the tophat as getting to the bit behind the seat / corner of the walkway will be a nightmare to do properly once the tophat is welded in.

Remember this from a few months ago?
8j5Vl.jpg


Thanks to Grazy for collecting these from Vanfest, I've now got a decent rear corner to replace it with :D well chuffed.
39ZyX.jpg


A body cut from a cali 68 courtesy of Fruitpiece on here. Thanks Jon

Hopefully it won't be another 3 weeks before anything happens! Got a serious bit of motivation from going to Action (in a pre production Bay - funny thing with the windscreen in two halves!), going for a blast in Grazy's bus after sorting his electrics, and the kids moaning "I thought we were going on holiday in it this year" :roll:
 
where you have drawn it is about right, but if i were you i would get the top hat in 1st. Once in the right place and seated on the main chassis rail between the inner sills, the inner arch then extends down to the lip onthe top hat that meets the outrigger. The floor then boutts up straight across the shorter horizontal line

best pic i got f it helps

Type20235.jpg
 
Hi Nugsy, thanks for the info. What I'm trying to work out (nicked your pic to help!) Does A go behind B (i.e. is there a return lip on the end of B that spot welds to A)
Type20235.jpg


Maybe better in this one! C is the heavy plate for the walkthrough, and B looks to come round the corner of the walkthrough and drop down to form part of A?
0124.jpg


Maybe I'll just weld it all up and seam seal the whole lot! not like it's going to be seen! :lol:
 
Worked out what's what! The seat back bottom curves round the base of the seat and then goes on to form part of the rear arch closing plate. So chopped out the rusty bit
liAp1.jpg


as I wanted to be sure that any rust was out before putting the tophat in place and this bit was almost no existant. Looks like this is a rust trap with moisture coming from under seat box, rear heater vent enclosure and from the ridges under the floor.

Using a piece of the old wheel arch (may as well reuse as much OG metal as possible! need to make the rest of this
bGeDc.jpg


Cleaned up and etch primed and rough template marked out
x6uTE.jpg


Weld through on the metal behind
DuLVC.jpg


And clamped up in place ready to weld
BtfAS.jpg


Realised it's too late to make anymore noise so left it until tomorrow!
 
Got half an hour before noise curfew so thought I'd get this bit done and posted up then back to the garage to scrape underseal and shite by hand!

tacked in place
1ldp8.jpg


and all the way round
lTXOr.jpg


and cleaned up
pPgyf.jpg


just got to etch prime :)
 
Cheers Nugsy :) Just wanted to get some good metal in there as once I've got the top hat in it's pretty much too tight for space to get it cleaned up and sealed. Probably looks like a lot of work for something that's not going to be seen but hopefully worth it :) I'll cut that piece down when the closing plate goes in when I do the arch etc but at least I've now got something to weld to :)
 
A bit more done. N/S front outrigger on :D tick
MqOBs.jpg


Jacking point just laid in to make sure all lines up
oT2r1.jpg


repaired same as the other side
TAoM4.jpg


O/S front outrigger on :D tick (excuse the crap pic!)
xlVjB.jpg


Front Top Hat in place, gear rod tube lining things up and front crossmember offered up for fit
gbQRJ.jpg


Just a bit of fettling, clean up and etch prime etc and then I can get my latest ebay bargain (read new toy) out adn play
EnhRW.jpg


Looking forward to spot welding those outriggers and crossmeber to the tophat and NO welds to grind down :D
 
Grazy popped in on Saturday and as usual offered his own brand of advice :D (well, made him a cuppa and had a chat ;) ) and as he left in his panel, I thought, fuck this, got to get this moving! Cheers Bud :D always get me moving again!anyways, back to it, so, top hat spot welded in place :D fookin brilliant, how have I managed without one! :D
rfLmO.jpg


SBeIw.jpg


and after hours of faffing about finally managed to get the front cross member in place, touching in all the right places and welded that in too :D
CBuNo.jpg


Then cleaned up the tops of the I Beams and plug welded where I'd been a bit too over zealous drilling out spot welds
e4GZx.jpg


That was a good days work in the end! Seem to be getting somewhere. It's better when bits start to go back on, bit of a motivational kick up the arse :eek:
Hopefully cleaning up the remaining cross member welds tomorrow before noise curfew and then onto the remaing outriggers and rear top hats. :roll:
 
Some nice welding going on there 8)

Its great when you stop taking things off (like rust) and start to put things back on (or in) :mrgreen:
 
gninnam said:
Some nice welding going on there 8)

Its great when you stop taking things off (like rust) and start to put things back on (or in) :mrgreen:

Thanks Andy :D

:lol: yep, like lining up the front crossmember early Saturday, went to tack it in (clean shiny metal behind on the chassis rail) and blew straight through! ended up replacing the chassis behind it as it was as thin as a kitkat wrapper! and about as much use!! happened both sides, so looks like rot from inside out! going to have to check the rest of the chassis that I thought was OK before going much further! took the best part of an afternoon to cut it out, shape some repairs and weld in before getting back to where I was! Still, it's done, good metal in place now so happy that a little progress has happened :D
 

Latest posts

Top