My 69 "Ex Volks Tuning" Panel , build /make over thread.

Early Bay Forum

Help Support Early Bay Forum:

This site may earn a commission from merchant affiliate links, including eBay, Amazon, and others.

fozworth

Well-known member
Joined
Sep 11, 2013
Messages
684
Reaction score
1
Location
Bristol
Right, I thought I'd better start this thread as otherwise I'm going to end up with an awful lot to write in one go .
I've always had a passion for classic air cooled dubs and have loved every one ,from my first one owner 66 Devon tintop which I paid just £600 for ,through to the my last 65 split panel which I brought in from SoCal ,as well as the other couple splits n eleven bays ,all of which I've loved and felt some regret once I'd parted with them :-(.
And so it bring me on to my latest purchase and hopfully this one will be a keeper,or so my wife hopes!
Panel vans are my thing and after regretting the sale of my split panel a few years ago I wanted another but as splitty's are out of my price range now ,it was going to have to be an early rust free bay.
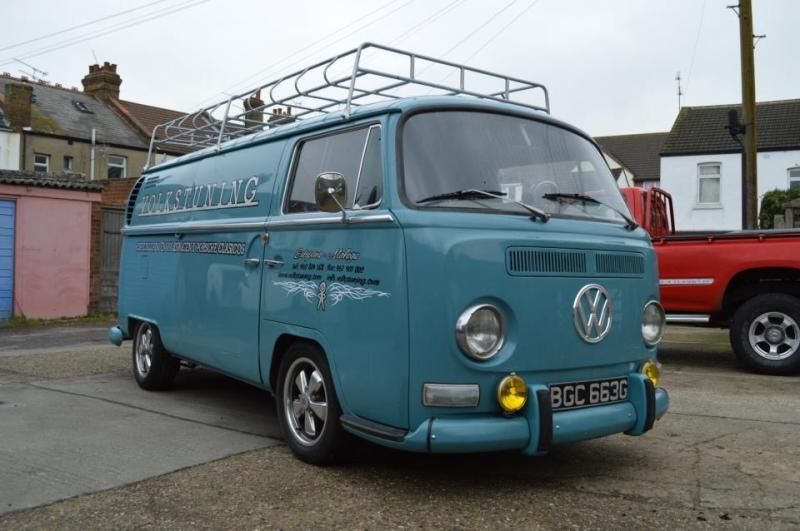
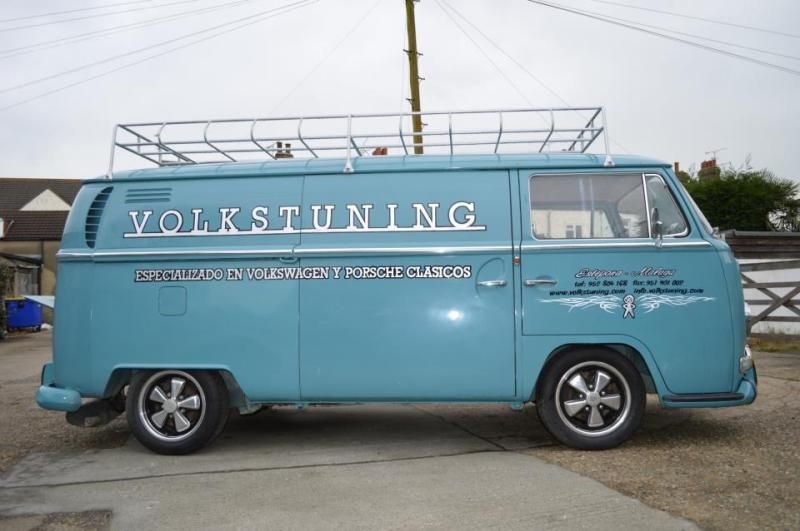
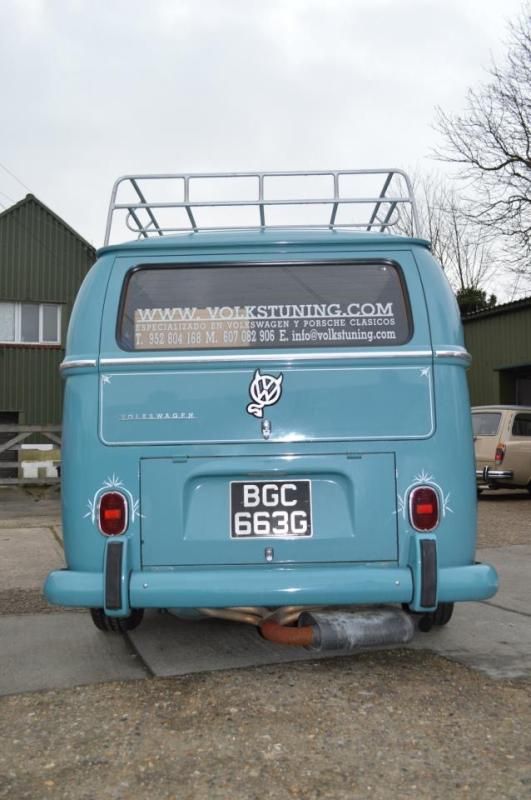
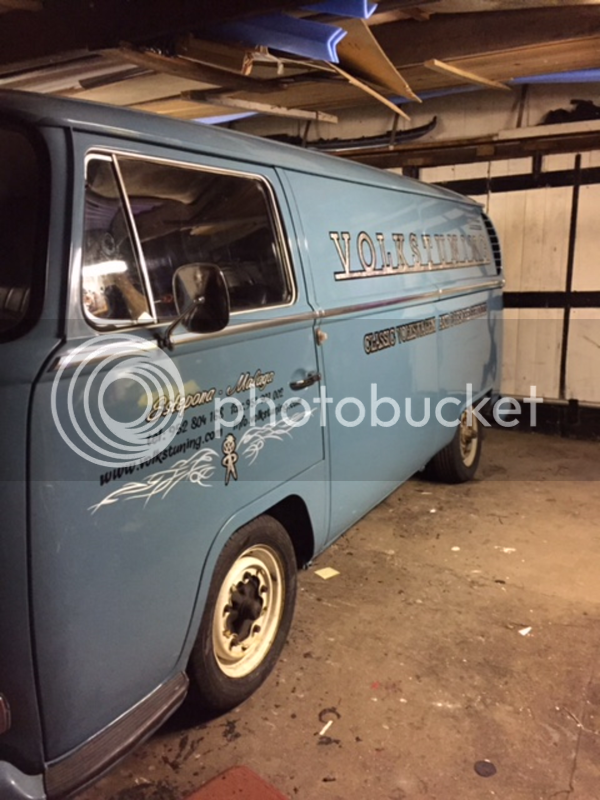
After some hunting about I came across a good solid bus owned by Luis who owns Volks Tuning in Malaga in Spain hence the sign writing on the van .He had the bus in storage at his friend Paul who owns Harry Harpics in Lea on Sea. After some negotiation a deal was struck and I was the proud owner of a December 68 built panel .Registered in Italy in 1969 ,its spent most of its life in a nice dry climate,so thankfully it's super solid,needing only a very small amount of welding (its first ever needed) I picked it up December 2014 and drove home to Bristol at night! Not the nicest first trip I might add.
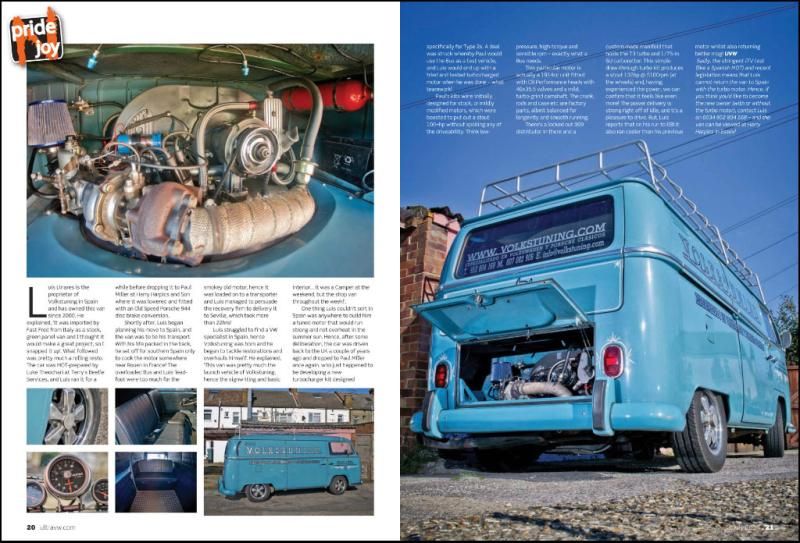
The bus had been previously featured in VW Ultra Mag earlier that year supporting a lively low pressure turbo motor developed by Paul at Hary Harpics as well as Porsche brakes etc.Unfortunatly my budget didn't stretch to that so I settled for a fresh 1641 and reverted back to wide 5 drum brakes .


Here it is back in my garage before the work commenced .


I spent the next few months on my back underneath the van sanding and cleaning up every inch of the underside (oh for a jig) along with a few small areas the needed welding ,these being two small patches on the drivers cab floor ,one front jacking point ,the bottom 6 inches of the B pillars ,a couple small inner sill patches and a inner and outer front valance and cab step outers. All the rest of the bus including both battery trays is genuine metal .
 
Here's a few pics of the underside before I treated it to two Coates of Epoxy Mastic 121 .


Once the welding was completed and I had finished painting the underside ,I removed the front beam to replace it with a T2D narrowed adjustable unit .This was married up to a pair of Transporter haus D/S . I rebuilt all four brakes and detailed the running gear at this point .


Up back I've got T2D adjustable Spring plates and since this pic ,shortened shocks.

Finally Back on the deck .
 
Next I fitted some creative engineering adjustable tie rods ,a new draglink and a Volks Projects air shock system up front .Im really happy with this and plan to fit air shocks to the rear as well as a air tank .
Also took delivery of some BBT Sprintstars 4.5J up front and 5.5J rear

 
Once the underside was fully sealed in the epoxy mastic I then started sanding and cleaning up every inch of the inside floors ,sides etc.Luis had fitted alloy checkered plate to the cab floor and cargo floor which was a major task to remove in its own right .I had hoped to be able to sell them on for a few ££ but the one on the cab floor was so tight/ perfect fit (a credit to the installer) that I had to cut it and remove it in sections.the rear came out in one piece .


Aside from surface rust the floors were very good.

So after a good deal of sanding ,rust proofing and Another £100 of epoxy 121 ,this time grey the inside was sealed .

 
Next I decided to remove the engine and gearbox and do some detailing .
I changed up some of the tinware and powder coated every bit I could in a costly but nice hammered finish.
I also thought it a good time to remove all the gear linkage and replace all bushes and couplings .as I've shelled out for a BUGTECH bus. Shifter which will take pride of place later on.


Had a nice delivery turn up today :)

 
So just to bring the story up to speed .I had originally planned on keeping the colour (although not really my bag) and getting all the areas blown in ,.and so after showing a friend a few pics we agreed a price and I trailered the panel over the bridge to S Wales. Unfortunately pictures never show a true representation of the work needed ,and upon seeing the bus and having a good look around it thought it deserved to be fully repainted as what paint I was trying to save was 10 years old and tired and the cruidly painted sign writing wasn't vintage and would have made a touch in job a nightmare.
Unfortunately with a full respray now on the cards it was serious money and not just a few hundred . I made a decision to sell my pride n joy mtb to stump up the rest of the money and got £3500 together .Sadley through no fault of my friend he was let down by his painter and after 3 months my bus was being trailered back to Bristol to Jeffs VW Shack where it is currently undergoing a full inside and out repaint in VW L345 grey with L581 cloud white badge n bumpers.
Will update with a few pics as work go forward .
At least it's given me time to search and buy as much genuine NOS parts to refit when it's painted .
 
Popped over to Jeffs this arvo to see what progress has been made on the bus. By all accounts they have had a right mare removing the sign writing as it was heavily lacquered over the silver leaf paint and as they didn't want to attack it with a heavy DA disc which while removing the signage would leave some nasty ripples in the remaining paint leading to extra prep work further down the line .So a scraper and solvent have been used and it's now nearly all gone.Aside from most of the dash now being removed it's still early days .Hopfully things will move along next week.
He did give me a colour test sample of the L345 paint that I've asked for and I was quite surprised how much of a greenish tinge it had. See below .I know paint can vary and pictures are hard to go by but I had sort of hoped it would be more grey .Jeff did add that it would look different once on the bus but said if I'm unsure and want to change colour how's the time to think .
Does anyone know if there's a age related grey used on early bays that more of a straight light grey? If not I guess it will be ok but I need to check all possibilities .
 
Have a look here http://www.thesamba.com/vw/archives/info/colorstype2.php" onclick="window.open(this.href);return false;

Sometimes you just have to go for it if that's the hue you want. It's gonna look awesome in new paint anyway 8)
 
Cheers ,I think your right ,and as long as it's kinda like the buses I've seen in the pics I'm sure I'll be happy ,just don't want to much green .
 
Ok so I popped over to Jeffs VW Shack today to check out the progress of my panel. Apparently it's been a real slog removing the sign writing as it was heavily lacquered over .They didn't want to use a narly DA disc as it would only create more prep work further down the line so solvent and scrapers were used .one side as you can see is pretty much back to bare metal. The windscreen removal revealed no nasties which was great news .Only a couple tiny pits are going to be drilled and welded .I look forward to seeing the progress next week .
Here's some pics from today .
I also took the plunge and ordered a MCJ wood rim steering wheel which should arrive just in time to fit before it leaves the body shop .


How was it doing the under side? How many coats and how many litres of epoxy? It's one of my next jobs to do.
Looking good!
 
Cheers Andy .To be honest after doing my last two split screens I vowed I'd never do an underside unless I hired a ramp ,and I meant it at the time! Believe me. My back looked like I was attacked by wild dogs. Unfortunatly I didn't get to use a ramp with this bus either but managed to raise my bus about a foot and a half on stands which helped with arm movement .And this time I took about two months not two weeks .Paint wise I stuck two Coates on and then used Black Dinitroled on the inner arches and chassis legs .I used two and a half chassis kits which allowed me to completely paint the inside as well .So the underside took 1 kit in black and the inside took 1 1/2 kits in grey .With the Dinitrol and Rust killer which I painted everywhere before the paint went on ,it topped £300 not including a zillion brushes .All I can say is it better last ! I'll be using my compressor to cover and inject all cavities with wax oil once it's all painted ,more money ;-)
Cheers Ja
 
I know it's not a cheap job but, better than welding new metal in down the line! I think you can get the epoxy 121 in colour match to the body but you have to buy about 5 litres. Did you use that fe123 rust treatment? They hype it up, not sure if it's any different to any other or not
 
I did use the FE 123 for the underneath but ran out for the inside and found a much better value inhibiter and as I only had surface rust I wasn't worried .You couldn't water it down like Rusts stuff but it still made for better value .They use it on boat ballist and other marine metals so figured it must be good .But they all do the job I think to a point .I figured black on the underside was ok ,for me anyway .
 
Just thought I'd share a few of the latest pics of where the works are at presant .its been very slowly moving forwards due to the nightmare the guys had removing the old sign writing .As the hours have racked up on the outside the majority of the inside which I painted in grey epoxy 121 will see a light key up and paint in the chosen colour as it seems pointless spending 40-50 hours flatting the inside areas that will be covered in closed cell foam and the ply lining kit ,plus I'd rather see the money/hours spent on the outside and other areas you see that arnt covered.
I think the next step is for the motor and fuel tank to be removed ,then the remaining part of the dash.


Latest posts

Top