Stu & Clare Present Murphy - Aircooled Campout 2020 Pics

Early Bay Forum

Help Support Early Bay Forum:

This site may earn a commission from merchant affiliate links, including eBay, Amazon, and others.
Engine and gearbox combo should be awesome [emoji41] are you sure Murphy is up to it [emoji38]

Who did the engine restoration for you?


Sent from my iPad using Tapatalk Pro
 
Cheers all - Murphy will hopefully be upto the job.

I had a remote brake servo installed before starting by Graham at Midland EarlyBay and will be running more aggressive EBC Pads on the front to assist in reigning in the extra power - rear disks will find themselves on there eventually but Ill just keep them well adjusted in the interim.

Engine rebuild was completed by little old me - slowly but thoroughly, had the heads skimmed by a machine shop when I replaced the head gaskets but that was the only outside help I received. Its been throughly given a going over and taken from literally a block with the crank and pistons in to as you see it now. Engine has covered a little over 100k and there are still clear and visible hone marks in the cylinder bores and good compression on all the cylinders.

Wanted to achieve a professional finish without the professional price
 
Hey Stu great work dude ..... someone wise once said to me “your bus your rules “ Guess that may not apply these days. Keep up the updates and if all else fails revert to the one true leveller of any bus related problem ..... take a step back and have cold Beer !
 
toffo24 said:
Hey Stu great work dude ..... someone wise once said to me “your bus your rules “ Guess that may not apply these days. Keep up the updates and if all else fails revert to the one true leveller of any bus related problem ..... take a step back and have cold Beer !

Thanks mate. :D
 
mike202 said:
Saw some pics on the big engine thread. Looks fantastic ! Are you going to add a write up on here? [emoji39]


Sent from my iPad using Tapatalk Pro

Mike - yep when its done and running Ill be putting a whole build thread up on here.
Dont want to jump the gun just yet as its still work in progress.

Have the engine, gearbox and loom in however still havent plumbed the coolant lines, hydraulic clutch, accelerator cable and several other jobs.
The exhaust is being made as I type this so getting closer.
 
So now we are finally rolling after some teething issues I suppose it’s time to have a go at doing some sort of retrospective build thread of the engine & gearbox conversion.

Suppose it initially started back in September/October 17 when I finally bit the bullet and pulled the engine and gearbox from the bus.

Out with the old

08907d6cd0e4628ec28836c4647e54c0.jpg


Ironically the engine was performing flawlessly but unfortunately I had lost faith in the quality of aircooled parts and regardless of who I bought replacement items off they were mostly shite. So onwards and upwards.

My old 1600cc Twin Carb engine complete with VS Exhaust was sold to a top fella called Trevor who drove his bus up from Shropshire so we could do the transplant into his bus on my drive - his older single port 1500 was removed and mine was fitted. Nice and straightforward and Trevor had the benefit of a 5hr test drive home after it was done. So I was happy the engine was good.

With the engine sold and gearbox I had taken a perfectly serviceable and driveable bus and turned it into an expensive garage ornament.

101d48a2a6cbd425031de60b15809da4.jpg


Gulp


Sent from my iPhone using Tapatalk
 
Next step on the journey was to source some quality parts for the conversion and I dutifully went spending online with some of the reputable companies available.

I chose not to get the conversion done professionally by the likes of Fellows Speed Shop or TSR purely down to budget as the conversion I wanted to complete would have been way over £10k. Probably closer to £16k and this way I should have change out of £5k mainly due to me wanting the following spec

Single Overhead Cam EJ25 Engine (2.5 litre flat four) mated to a SubaruGears converted 5 Speed Impreza box, water fed heater and a (semi) detailed engine.

Have a look at their respective websites and play with the spec options - it gets scarily expensive very easily.

So back to the parts - RJES has a great reputation for quality parts so he provided me with the Radiator pack, Engine Mount, Accelerator Cable kit, Exhaust flanges, Alternator Belt and some other sundry items.

d5a3621dcdd826e70e929255182737b5.jpg


080d60619daa57cd246e2994dc47f885.jpg


The rad pack is an awesome bit of kit and so very well made.

I also was able to happen upon a crate Impreza gearbox for the Subarugears conversion on eBay brand new and totally unused with all the sensors, cables and slave cylinder and so on. All for less than an aircooled 3 rib box of unknown condition.

f35810600b018738e39f755eb1e6db97.jpg


Whilst all this was going on I also decided that at some point in the future I would be installing an engine access hatch in the style of a late bay or T25 so after some searching I eventually got a T25 chassis cut and engine access panel

09c310107fc8153c35e6cbc95d020fb8.jpg


40564e7a5339379f18f90ef914ddcea4.jpg


Obviously there is an issue with the size of these two parts so I cut and welded them back together so they could be installed at a later date. I’m thinking winter 18 for installation.

b9e4317c79096984214da62ee3f4e535.jpg


Sent from my iPhone using Tapatalk
 
With me amassing parts and deciding the way ahead I had some hours of research to complete. Some of the research included:

Converting from carburettor to injection fuel system and engineering a fuel return to the tank

Installing the 5 speed box and sorting the linkage.

Wiring - which I hate as it makes no sense to me.

How a Subaru engine actually works and how to rebuild one including do the timing gear, water pump, oil pump and so on.

Installation of said engine and how it fits in the EarlyBay engine compartment.

YouTube was very informative and having spent several hours watching various videos I was pretty confident to carry out the work.

I was able to speak to Matt Peaker of PopTop kitchen who has helped me massively throughout the whole process and he was good enough to put in touch with a guy called Nick Tune who sources strips and converts Subaru’s and builds gearboxes.

So one evening I was able to drop off my brand new gearbox with Matt Peaker on his way to Nicks so he could get the flipped differential installed and convert the ratios - think he was collecting another engine to play with.

Several weeks later I returned where I collected the converted box, an EJ25 Engine from a 2001 Subaru Legacy and the all important loom which incorporates ECU, immobiliser and all the relays. It’s Nicks speciality and he did a great job. Although the engine looked a little tired and needed a rebuild with headgaskets, cambelt and most of the ancillary items changing, however it was the type I wanted being the SOHC version utilising OBD 2 protocol so I was happy

6108947cf0d9c9597fb391de1e12200d.jpg


3d558fef00205c968e18f7cba4cabd1f.jpeg


With the engine, loom and gearbox back home and safely in my man cave the strip down commenced.

On a lowered bus the standard sump hangs far far too low and close to the ground to be practical for use so I had sourced a special item from the states.

I decided to install a SmallCarPerformance sump which as far as I can tell is the very best option available and facilitates the sump being used as an actual jacking point due to its strength.

1d9f4f5b8d3b65e4bdb9eda60866c4d2.jpg


Sent from my iPhone using Tapatalk
 
The engine was in a pretty sorry state if I’m honest and appeared to have been neglected although they all appear to be like this due to their age and mileage. Mine had covered a little over 100k and the car was scrapped due to a corroded subframe that was uneconomical to repair.

As I wanted a clean looking engine to show a contrast to Murphy’s OG/battered paint the block was stripped - intake manifold off, timing gear, water manifold, sump off, oil and water pump removed until I was left with the engine block with the crank and pistons in.

When I removed the heads to check on the headgaskets - one side had gone which was expected as it is a weak point on these engines and can be expected to get changed every 80/100k.

8db11c68e2d1e2b19a4976cde78a4785.jpg


b7fa7bba9d4fc0b62a40e1ec17266359.jpg


3848f5b7a3215128862d377640631208.jpg


cabb298b122381c9ce09f3e784d5162d.jpeg


The heads were sent off to a machine shop for skimming and I started to try and clean 17 years off grime/corrosion and filth off the aluminium block.


Sent from my iPhone using Tapatalk
 
With the heads off for work and the block stripped I started cleaning it up. Using a combination of a drill mounted abrasive tool and some acid spray along with many hours of elbow grease it started to look a little more acceptable.

The heads were turned around in a couple of days so they were collected and given a final wash in my bespoke parts washer once Clare was out at work to remove any residual swarf and debris from the machining.

38c532f7a11d41d49e31db0f1d8c4fdf.jpg


Whilst the parts washer was in use I decided the rocker covers also could do with a bath so in they went too

39748a5629890ea3444233b7a23fe319.jpeg


With the heads back and cleaned I refitted them to the block with some nice new headgaskets. I decided to use Felpro as they are highly recommended in the states - those or SixStar but I couldn’t get SixStar!

66fc2de963b016ae67470377a4dc6dcf.jpeg


83e474b9fae6b72f23f0648351815711.jpeg


Whilst ordering the headgaskets I also ordered new seals for the water manifold, spark plugs and seals, new engine covers for the timing belt, new timing belt kit from Gates, new water pump and many other odds and sods.

This is where the conversion can start to get a little out of control regarding the budget as it’s hard to estimate what these bits will cost before stripping the engine. Fair to say it was a few hundred quid.

e6942aa8ed3b5c5da275af2eac33f23a.jpeg


dda3eff0c4e8b8ad8e52e082ca17c760.jpg


93090cf66123f70375f1c67dcd919df2.jpg


The acid was rather unpleasant and needed time to work on the corroded aluminium so I could get a key for the primer. The abrasive tool was great for cleaning up any mating surfaces such as the coolant pipe areas, exhaust manifolds and so on.

ffded7bb6beda609c87d8293a69ceddf.jpeg


31b1d612221c3924eea7aa7f79b7286c.jpeg


With the block drying after the first coat of acid etch primer it was time to install the cambelt kit and ensure it was correctly timed up.


Sent from my iPhone using Tapatalk
 
The timing is rather important and initially it appears to be overwhelming due to the number of rollers, pumps and components involved however after following a comprehensive YouTube guide it went rather well.

d66405aac6f012bedeb574752718ae21.jpg


f370e935093c485069ae0edf4d783967.jpg


3ba02382516ef3847f5a0b164e9be3cd.jpg


2246c28bf6cd92a9cc115534c98935e8.jpg


This is a pic of me setting the clearance for the anti bump cover which prevents the belt jumping if you get knocked whilst the engine is in gear. These are often missing on vehicles with automatic transmissions that are being converted.

5bab1674cc8c432a3a8a05099efcd6fb.jpg


Whilst I was there the old spark plugs were swapped out and replaced with fresh ones

You can see where the seals have failed and covered the spark plug in oil and crud.

af3c22a7a4a9941d23cf73c602c9ba05.jpg


6e088e5ced3db4d558786ab5a3fabffb.jpg


Sent from my iPhone using Tapatalk
 
With the block taking an age to dry due to the time of year - it was December 17 I had to use a supplemental heater so the paint would go off. After a couple of coats of acid etch primer the silver colour was applied. Without media blasting I couldn’t figure out a way of making the block look new and if blasted it would corrode again in no time.

2991fc2b116e47694507edc170fca291.jpg


Think it turned out looking pretty nice!

With the block painted after I couple of coats I decided to tackle one of the areas I was dreading. The intake manifold - this area incorporates all the fuel rail, injectors, throttle body, various sensors and even has coolant lines! As they are rather delicate I removed the manifold from the garage and stripped it on the dining room table - again Clare was at work [emoji23]

d010f80d6bcf51fd07ef1eab8f8dbcde.jpg


5635806141d2ca55930e09e8edbcc40a.jpg


dba4a9b25b6b31e91bb8e13b3873b8f7.jpeg


9c22f9fcd4f96c36438d4039dee44f72.jpeg


Some loom action carefully removed from the manifold.

6c4fe305b5de9c385a1a3650f6088dbb.jpg


And all taken apart.

c305213ba8614feaec18a89ec5b1c095.jpg


With it in pieces I blanked up all the ports with masking tape cleaned the aluminium surface with the acid spray wiped down and cleaned with water then applied a few coats of primer followed by red.

Some odd Subaru engines came with plastic manifolds but they are best avoided due to being utterly rubbish.

e2599c42b90ed37c915978e6beaa44a2.jpeg


fdf90ad1bfd39439ae3b6e47051b27da.jpg


d3857585e34998c4290263e21fa97f96.jpg


fff516d8332afcfcb1581490cfb2936f.jpg


634e5474958d766ed40e10dc43774872.jpeg


With the intake manifold all painted, the engine all timed up with a fresh water pump, oil pump seal and various other components and rubber parts replaced it was fine time to start rebuilding.


Sent from my iPhone using Tapatalk
 
The rebuild was fairly straightforward mainly due to the fresh parts and exceptional build quality of these motors.

Considering the engine had covered in excess of 100k and wasn’t exactly cherished there were still honing marks clearly visible in all the cylinders.

With the cambelt covers fitted, water manifold cleaned and installed along with new gaskets and a fresh oil filter it was starting to look like an engine again.

6f63f4d5cd46fb10d161e4100576128c.jpg


As standard the engines run a serpentine belt setup off the crank that powers a power steering pump, air conditioning compressor and the alternator. All I needed was the alternator so the rest was chucked.

Rather rapidly - like in less than 2 hours I was left with this.

22378648ec39c38071d8a4d49347e9c8.jpg


New HT leads installed and a sump mounted oil temp sensor and top mounted oil pressure sender so my old gauges would work. Also replaced the crank sensor and camshaft sensor as they were pretty cheap.

a322246a095809d552cacdf8e577c070.jpg


With the front aspect of the engine and topside sorted - really wasn’t much more I could do unless I split the block it was time to look at the clutch/flywheel oil seal and components on the back of the engine.


Sent from my iPhone using Tapatalk
 
K@rlos said:
Did you do any porting or chamber work to the manifold and heads?

No mate - didnt touch anything in that area, they are pretty well flowed as standard however if it is needed in the future its not too much trouble getting access to the heads again.
 
Similar to VW engines the flywheel/crankshaft oil seal is an area that can be prone to leak at a certain mileage - so when the engine is out it makes sense to replace it.

However to get to it I had to remove the nasty and in parts melted old flywheel that came with the engine. It wasn’t getting reused

e3123998ec1e52b264a733d8b9dcd1a0.jpg


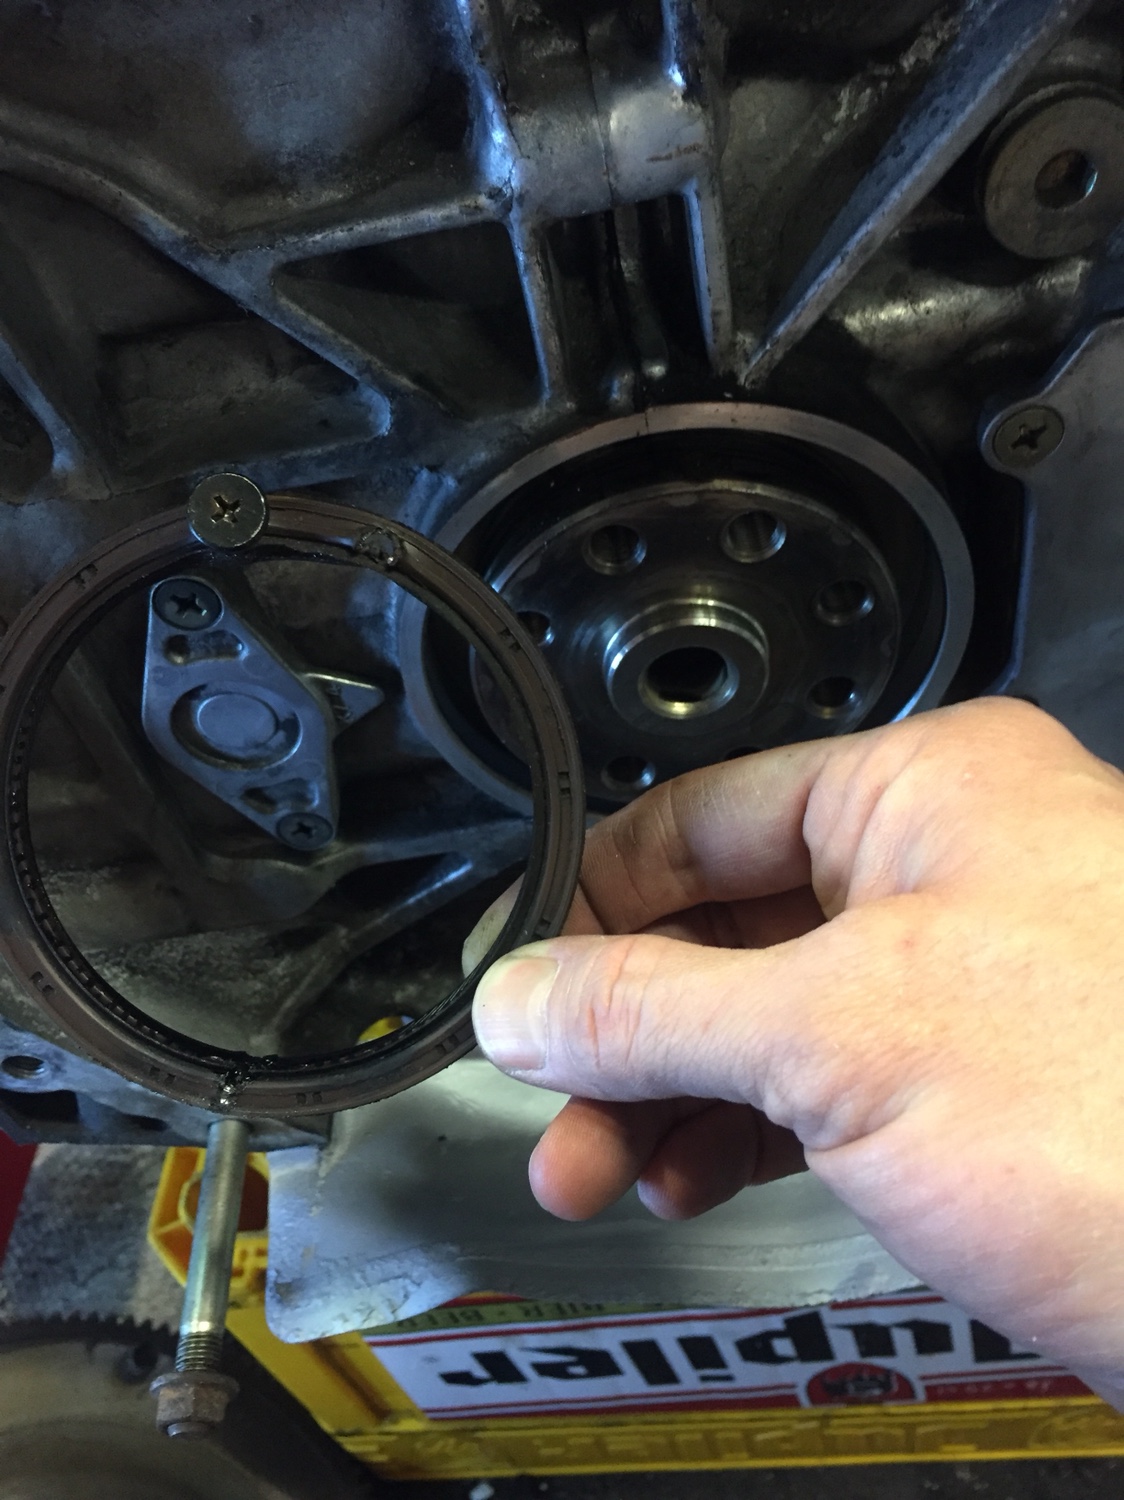
With the flywheel off I could see the oil seal has been seeping so out it came - and again in this area some engines have a plastic plate instead of a metal one that is prone to cracking.

0ea1dfca8f08028c5b51c93cda7a90b0.jpg


6e29870a973e252c680471d3a6ed7234.jpg


With it removed it was time to give the area a good clean and wipe down and fit a nice new part.

dac6b3483dc169fed29063093c4d62b1.jpg


The reconditioned flywheel had a new pilot bearing installed and was reinstalled to the engine.

d560e470930be4d1ab3f886e90fe5e26.jpg


The brand new clutch and reconditioned pressure plate were also installed and torqued to spec

3bf6910d4989b1fa98aa64e33d2010a0.jpg


272a2a06cdee8be3513d233dca84083e.jpg


To sum up if I can remember it all the engine has had:

Gates Cambelt Kit Inc all ancillaries
Gates Waterpump
Subaru Oil pump seal
Bosch Spark Plugs
Subaru Spark Plug seals
Custom HT Leads
Subaru Water manifold O-Rings
Felpro Inlet manifold Gaskets
Felpro Headgaskets
Subaru Crank Sensor
Subaru Cam Sensor
VDO Oil temp sensor
VDO Oil Pressure sensor
Subaru Oil filler O-Ring
Subaru Rocker cover gaskets
SmallCar Performance Sump inc oil pickup
Subaru Crankcase oil seal
Subaru Exhaust studs all of them
Custom Alternator belt
Subaru Harmonic pulley
New fuel lines (PTFE Braided)
Reconditioned flywheel
New blueprint clutch plate
Reconditioned pressure plate
Subaru New Flywheel pilot bearing
Blueprint Oil filter
Various nuts and bolts that had become corroded or rounded off over the years

Fairly comprehensive and expensive list of parts never mind the paint and time spent.

At this point I was starting to appreciate perhaps why the professional conversion companies cost so much

With the engine pretty much wrapped with mostly new components it was time to start on the gearbox


Sent from my iPhone using Tapatalk
 

Latest posts

Top