Help needed with repairing gutters

Early Bay Forum

Help Support Early Bay Forum:

This site may earn a commission from merchant affiliate links, including eBay, Amazon, and others.

USwesty

Well-known member
Joined
Aug 18, 2011
Messages
309
Reaction score
0
Hi all,

Im currently repairing my gutters but cant find how they are held togeather?

camperrust005.jpg


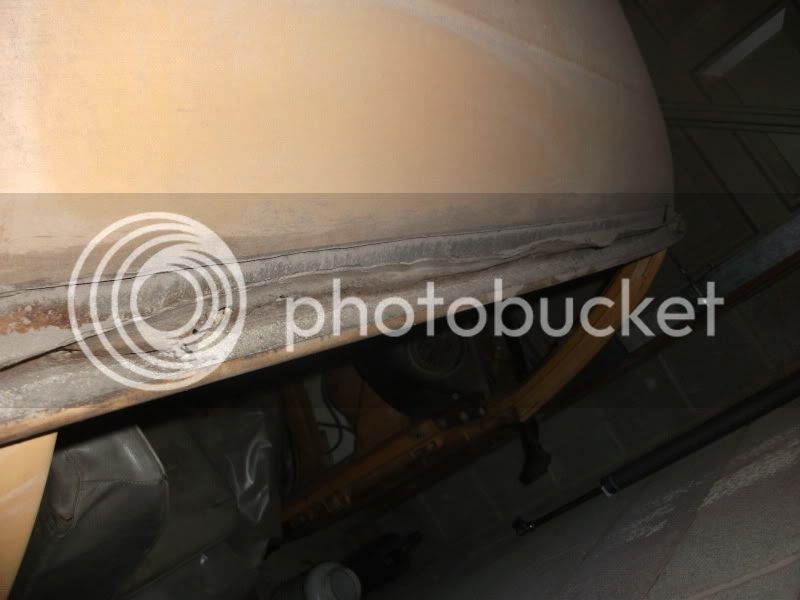
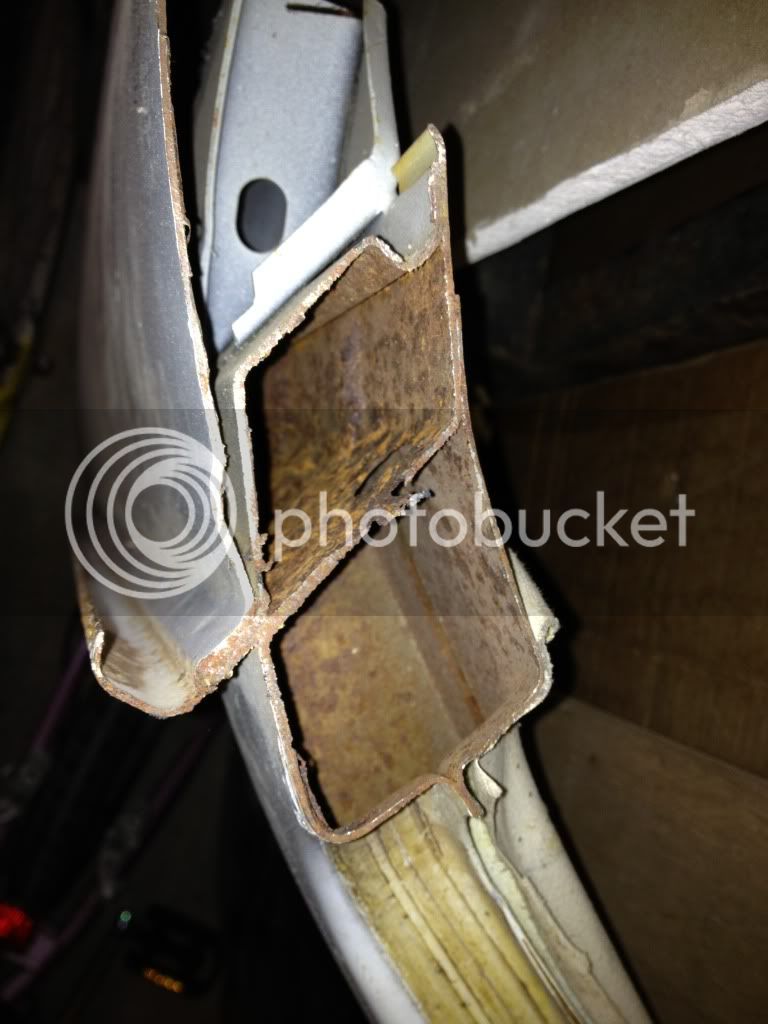
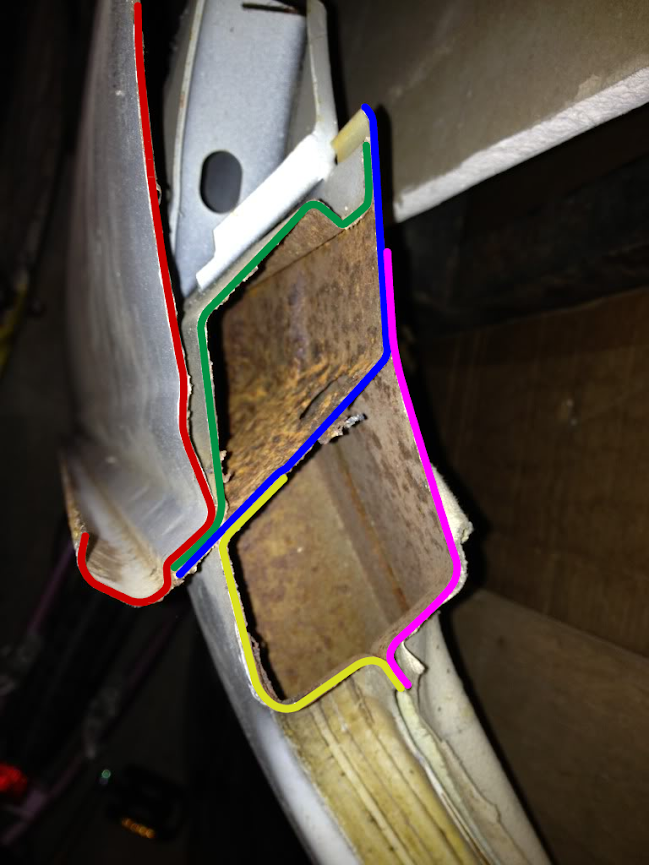
Here is one on the section in question, I only want to replace from inside the gutter and 2 inches up the roof skin. Iv tried drilling down the spot welds at the bottom of gutter but there are still solid.

Thanks Alex
 
That pic confirms what I thought thanks thank you very much! the gutters arnt very rust at all but its had a awning clipped to that section of the roof and its damaged the roof causing the roof skin to rot. Thanks again!
 
Just to clear it up a little more, the roof panel and the gutters are all one panel / pressing that is spotwelded to the sub section which is a squashed box section made of two seperate sections spotted together. To confuse even more, the squashed box has two wings on it on the opposite corners which is how it`s spotted together, the one on the inside is the one that you can hang coat hangers over in the van and the one on the outside is two skins thick and supports the roof panel making it a total of three thicknesses including the flat bit inside the gutter :? :? :? I1ll try and get a piccy of them seperated :mrgreen:

Ozziedog,,,,,,,,,I just confused myself even :lol: :roll: :lol:
 
More pics the better! much appreciated I realy dont want to make this a bigger job than it is. Thanks again
 
got a roof/gutter section from a 76 but its only 3ft long so dont think that will help you!!!
 
Struggling for decent picccys at the mo but cast your peepers over these :shock:

009.jpg

010.jpg


These are the roof panel going on to the rebuilt sub frame and if you zoom in you`ll see in the corners the gutter is part of the roof.
054.jpg

053.jpg


^^^ These are of the new roof panel about to go on and you can see where I`ve drilled the spot welds out where the roof panel attaches through the gutters to the sub frame

012.jpg


^^^ that`s useing the garage door as a crane / gantry to get the roof panel over the bus (on me own) If you look inside the gutters on the bus, there is a roundish section like your house gutters and a slightly raised 5mmish flat section that is the bit that actually attatches to the sub frame, if you look along the length of the gutter with a torch if necessary, look at the flat section and you`ll see the spotwelds. Under that is the lip or wing of the squashed box section / sub frame that is an additional two layers thick,, so three layers in total. You can just about make that out in Sparkywigs photo and if you magnify it you`ll see the three layers. If you want to give me a bell and talk it through whilst looking at the photos, then me number is 07723 069 937.

Ozziedog,,,,,,,,,,,,,It`s not as complicated as it sounds :mrgreen:

Ozziedog,,,,,,,,,,,Hope these help :mrgreen:
 
ozziedog said:
Just to clear it up a little more, the roof panel and the gutters are all one panel / pressing that is spotwelded to the sub section which is a squashed box section made of two seperate sections spotted together. To confuse even more, the squashed box has two wings on it on the opposite corners which is how it`s spotted together, the one on the inside is the one that you can hang coat hangers over in the van and the one on the outside is two skins thick and supports the roof panel making it a total of three thicknesses including the flat bit inside the gutter :? :? :? I1ll try and get a piccy of them seperated :mrgreen:

Ozziedog,,,,,,,,,I just confused myself even :lol: :roll: :lol:

There are a LARGE number of spotwelds within the gutter, at short intervals, of barely a few centimetres, that created sharp-edged craters, which tend to rust badly, because the paint film there is either extremely thin or non existent. These sharp crater edges, really need to be ground smooth, for which I used a combination of small needle files, plus small conical grindstones, in the flexible drive of my electric drill.
 
Spot on there Naskeet !! It`s a bit of a swine job to do when you have plugwelded all those spot welds and then have to grind them down to an acceptable finish, used a 4" grinder balanced on it`s head for most of it then got myself an air power file thingy to get it decent then painted it all round with two pack epoxy mastic over the tiger seal in the undersides where the roof panel sits on the lip formed by the wing of the box section. Should be good to paint straight over when that time comes :mrgreen:

Ozziedog,,,,,,,,,,, Eventually :lol: :mrgreen: :lol:
 
sparkywig you are a genius, have just picked up a new roof to replace mine, but my gutters are in a bad way all the way around so I will have to spend a while repairing these first. I'll post all photos on here of the job, but I now feel a lot happier about doing it myself!

That cross-section photo is now my desktop wallpaper...
 
roof-section-joins.png


hey guys I have edited the image to show the joins a bit more clearly, I haven't actually seen this in the flesh so if it's wrong let me know and I will amend it!
 
You got it !!!!!
That is spot on and exactly how it joins together, I think you is better on them puters than me :mrgreen:

Ozziedog,,,,,,,,,,,, SHHhhhaaaazzzammmmmmm :mrgreen:
 
No,, the blue line ends there and with the green line ending there as well because they are joined together to form the squashed box section I was rattling on about. The roof `panel' then sits on this ledge and is spot welded through the three sections to hold it all together. I can see where you is coming from but you can only see it in the flesh if you take off a whole decent panel. It took me ages to work out what was stuck where because of the dreaded tin worm in my original roof panel, you just could not tell what was stuck with weld and what was just rusted together in clumps :evil:

Ozziedog,,,,,,,,,,,,,And there was more holes than clumps :lol: :mrgreen: :lol:
 

Latest posts

Top