The Buss-E '71

Early Bay Forum

Help Support Early Bay Forum:

This site may earn a commission from merchant affiliate links, including eBay, Amazon, and others.
cunning plan said:
Hope that helps a bit buddy!

Cheers for the link, that should help out a little. The brazilian turned up when a mate was getting rid of his and I couldn't resist. I can't tell you how much it's placated the wife. I would rather have spent the money on getting the '71 finished, ho hum but I've got to keep the boss happy!
 
Hey Craig, you were right the bearing housings, they came off pretty easily. Before I removed them I took some measurements using a piece of steel bar. I centred one end on the side of each stud and marked the centre of the spring plate cover, I made a centre punch mark just before doing this.


I marked this centre point off on the steel bar (stained with engineers blue) and then lightly ran a hacksaw over the mark. It's not quite central in this pic as the bar slipped when I took the photo :? .


Just got to remember not to cut this measuring bar up and weld it to something.

I then set to work removing the bearing housings. All came off easily enough and amazingly no scrapped knuckles.
Pictures to follow.
 
Buss69 said:
Hey Craig, you were right the bearing housings, they came off pretty easily.

Good! :D


Buss69 said:
Before I removed them I took some measurements using a piece of steel bar. I centred one end on the side of each stud and marked the centre of the spring plate cover, I made a centre punch mark just before doing this.


I marked this centre point off on the steel bar (stained with engineers blue) and then lightly ran a hacksaw over the mark. It's not quite central in this pic as the bar slipped when I took the photo :? .

I am not sure that will help you much as you want to concentrate on the spring-plate position rather than the bearing-housing. :?

Right now I think that measurement bar will just show you where to position the spring-plate and bearing-housing horizontally, but, really, the horizontal position should not move.

When you reinstall everything, you will want the spring-plate as light as possible to ensure you can rotate the spring-plate on the torsion bar to get it on the right splines, which means, it is likely (or logical) you will install the plates on their own first.

If the spring-plate is currently in a 'stock' position, I would mark a set-point on the spring-plate, then measure to a point on the chassis. So for example, measure from the torsion bar along 250mm, mark, measure to chassis which might give you something like 160mm. Then, when you get your ARSPs, you can measure again 250 mm from the torsion bar along the spring-plate, and put a mark. Then, as long as you have that mark 160mm from the chassis, you should be perfectly setup.

EDIT: Take the spring-plate covers off first and the measure as you will not have the covers on when you reinstall and it would be too much hassle to install everything, put the covers on, then find out you are one spline out, then take everything back off again. The spring-plates *should* not move when you remove the covers, just do not put your fingers anywhere in-between the chassis and spring-plate until you are sure the tension is released. For my ones, I used a jack to hold the plate where it was, then a pry-bar to gently pull away from the torsion bar until it could be lowered past the chassis tube 'stopper', then I gently lowered the jack. I then realised that there was no tension at all as it was lowered by the PO. This meant I could simply slide the plate off, the torsion bar also came with it as they had corroded together! :shock: :|

On another point, can you still buy TPH ARSPs then?

:popcorn:
 
cunning plan said:
I am not sure that will help you much as you want to concentrate on the spring-plate position rather than the bearing-housing. :?

Right now I think that measurement bar will just show you where to position the spring-plate and bearing-housing horizontally, but, really, the horizontal position should not move.

Thanks dude but that's all I wanted it to do. Because there is lateral movement possible on the end of the spring plate I wanted to be able to check this off before removal. Not sure how useful it will be given the hole positions on the new spring plates. My assumption was that given the centre of the torsion bar cover is the same as the centre of the torsion bar, all dimensions will remain the same as they move in an arc based around this centre. If you know anything different please say, this is all new to me.

cunning plan said:
When you reinstall everything, you will want the spring-plate as light as possible to ensure you can rotate the spring-plate on the torsion bar to get it on the right splines, which means, it is likely (or logical) you will install the plates on their own first.

If the spring-plate is currently in a 'stock' position, I would mark a set-point on the spring-plate, then measure to a point on the chassis. So for example, measure from the torsion bar along 250mm, mark, measure to chassis which might give you something like 160mm. Then, when you get your ARSPs, you can measure again 250 mm from the torsion bar along the spring-plate, and put a mark. Then, as long as you have that mark 160mm from the chassis, you should be perfectly setup.

Check that, only installing spring plates on their own. As far as getting the angles right I'm using the smart phone App you used to measure the angles of the spring plates. Unfortunately my bus has already been lowered so I'm referring back to the Bentley Manual for the correct set-up. Did you set-up the new spring plates based on the original Bentley settings for your bus?

When you re-fitted your spring plates you mentioned how hard it was to do. Were the new rubber bushes that came with the new spring plates too big?
 
Ah, I misunderstood what you were doing. :msn4:

Buss69 said:
Did you set-up the new spring plates based on the original Bentley settings for your bus?

Ja I did as mine was already lowered as your Brazillian is.


Buss69 said:
When you re-fitted your spring plates you mentioned how hard it was to do. Were the new rubber bushes that came with the new spring plates too big?

Ha, you will have some fun with those! :shock: :lol: :roll: :character0036:

The bushes themselves are not too big for stock spring-plates, but when you use ARSPs, the mechanism causes the inner bush to have a larger diameter than it should.

I think they will wind in using the spring-plate covers, but you will have to get some longer bolts to start the process. I took my bushes to an engineer who ground-off 1mm or so from the thickest part of the bush to make it slightly easier.
 
cunning plan said:
Ja I did as mine was already lowered as your Brazillian is.

Nah, the Brazilian is standard height the '71 is lowered. But, you have given me an excellent pointer, guess who forgot to mark the position of the torsion bar on the passenger side before he took it out. What a tool? :? At least I marked the driver side. I can use the Brazilian as a reference. :D
 
So with Cunning Plan's ideas in mind I went and got the bubble protractor app and measured the spring plate angles.
First the chassis.


Then the spring plates, drivers side


Next passenger


Took the spring plate covers off and marked the position of the torsion bar before removal


Really surprised they came off really easily.


As mentioned in my previous post forgot to do this on the passenger side, which I guess means lots of trial and error when replacing.


All gone, entire suspension and brakes stripped down.
 
Now all the suspension is gone I can concentrate on sorting out the wheel arches before it all goes back together. And revealed the original "baby poo" Sierra Yellow the bus came in, I can't stand this colour and is exactly why I painted the bus in a different one. First a lot of white spirit and a shit load of elbow grease. With a bus on stands this is one crappy job. great results though.


Have to say I'm really relieved with what I found. Most rust is very superficial but well worth treating.


Just a couple of nasty areas, one at the back of the arch which is common and on both sides.


The other area isn't pictured but is at the front of each arch. There is a plug in each corner and both have crumbled on each side. The seatbelt anchors could do with being replaced as well. Thankfully all the other metal is in great condition, even the jacking points are solid as a rock.

My next problem is to work out what to do. I'm probably going to soda blast the arches and exposed chassis and then see what needs to be grit blasted, hopefully just the corners. Then I'm going to attempt to weld in as little fresh metal as possible. Anybody want to chip in with advice here, i've never done this before!

Once the welding is done I then have to finish it all. Now I have to say I've seen a few people with beautiful body colour arches and am seriously thinking about doing the same. The huge problem with this is the lack of protection in an area that is hammered by the elements. Obviously painting and then underseal would be a logical way to go. Or, maybe POR15 chassis paint. I'd love to hear what everyone thinks as I'm really torn.
 
Just spent a little time reading through your thread.

Wow !! that is serious dedication & attention to detail (OCD :) )

I did a similar thing with my inner arches & i was going to go down the POR15 route, but did not need to so chose the Acid Etch Primer & Gravitex option.

see Here


Stunning work !!
 
Mr Brightside said:
Just spent a little time reading through your thread.

Wow !! that is serious dedication & attention to detail (OCD :) )

I did a similar thing with my inner arches & i was going to go down the POR15 route, but did not need to so chose the Acid Etch Primer & Gravitex option.

see Here


Stunning work !!

Haha funny our buses both started out the same colour, that '71 steel really was the last of the good stuff (pre Russian). Thanks for the link Mr. B, i have a couple of questions. When you painted your arches did you take them back to bare metal or use the OG paint as an undercoat? I haven't seen any shots of the finished arches, did you end up sacrificing the red finish and go with the Dinitrol?
 
cunning plan said:
Buss69 said:
First a lot of white spirit and a shit load of elbow grease.

You did that with just a rag and White Spirit? :shock: No wire-wheel? :?

:lol: Yup I'm that OCD! :shock: Actually white spirit, A huge roll of industrial paper, a curved scraper and two screwdrivers (to get into the smaller areas). Not bad for a UK bus.
I'd been going out every other day for a week to spray the lot before I started on it. It gave it enough time to soak in. It was still a f**king miserable job though, 1 whole day (12hours with one 30 min break for lunch) per arch.
Now I've done this much I'm thinking of pulling the engine out and doing the bit in between. The problem is I've run out of space to put it if I do take it out. :(
 
Buss69 said:
:lol: Yup I'm that OCD! :shock: Actually white spirit, A huge roll of industrial paper, a curved scraper and two screwdrivers (to get into the smaller areas). Not bad for a UK bus.
I'd been going out every other day for a week to spray the lot before I started on it. It gave it enough time to soak in. It was still a f**king miserable job though, 1 whole day (12hours with one 30 min break for lunch) per arch.

MMmmyeah, I would have got the wire wheel out after 10 minutes of that!!!! :character0036: :lol:

Although, the way you have preserved the old paint has provided an excellent base-layer. Something I read a while ago: 'If it isn't rusty or damaged, why remove it' - which makes sense in terms of being logical about it and in labour time. It is much faster to cover what you already have with a good protective sealant layer.

Buss69 said:
Now I've done this much I'm thinking of pulling the engine out and doing the bit in between. The problem is I've run out of space to put it if I do take it out. :(

Yep, go for it, you won't be happy if you don't as it will play on your mind. :? Whilst it is out, you can give the engine bay a clean as well, then check for rust behind the fuel tank, then replace any seals, then....... actually, don't. :lol: < This is what happened to me before the whole, 'F*ck it, pull it all apart' idea. :sign0001:
 
cunning plan said:
Although, the way you have preserved the old paint has provided an excellent base-layer. Something I read a while ago: 'If it isn't rusty or damaged, why remove it' - which makes sense in terms of being logical about it and in labour time. It is much faster to cover what you already have with a good protective sealant layer.

To be honest I was scared of using a wire wheel and I needed to assess the condition of everything. But I didn't know it was always good to keep the old paint, another thing learned then :D

cunning plan said:
Yep, go for it, you won't be happy if you don't as it will play on your mind. :? Whilst it is out, you can give the engine bay a clean as well, then check for rust behind the fuel tank, then replace any seals, then....... actually, don't. :lol:

Damn you for saying that! I'm OCD enough I don't need to start pulling the engine again really do I? Dear god please don't answer that. I reckon this engine has done more miles on a trolley jack than on the road in the last 5 years.

cunning plan said:
< This is what happened to me before the whole, 'F*ck it, pull it all apart' idea. :sign0001:

:lol: :lol: :lol: :lol:
 
Right o, been a while since my last update so here goes. Well the last post got me thinking and in the end I ended up removing all my rear suspension (all of it!). And seeing as that was removed Cunning Plan was right I decided to do everything underneath from the rear belly pans back so I took out the engine and gearbox too (gulp).

This started on a bit of a spending spree of yet more workshop toolage, some good and some not so good.

I bought one of these:


but I had nowhere to put it so built this


Compressor (and bike store)


Running an airline to my shelter


and then back to the workshop to run this


Have to say, I'm not that impressed with the sand blaster. The first job was to clean up the rear hub assembly/ bearing housing before sending all the rear suspension to be powder coated.
What a crap job, this is the result of the first whole afternoons work.


Not a bad result, but a whole afternoon to do one piece?
 
The main reason for the poor performance was the fact that the sand kept sitting on the inside ledge of the cabinet.


If you put too much sand in the cabinet you can't see a thing. Too little and you're working with just air. The main problem is the angle of the base that collects the sand to be re-used is too shallow.


So I took it off


and remade it a bit deeper


A bit extreme perhaps but I was looking for an excuse to practise my welding in readiness for my next part of the bus project.


I've achieved a much steeper angle now and the grit flows much easier back into the base for re-use... however.

Have to say progress was still too slow for my liking and after a rather expensive purchase I decided to farm out all the suspension blasting and powder coating to a local company. What I learnt from this is if you have small pieces to blast this cabinet works fine but otherwise it's simply not man enough for the job. The local company did the job quicker, better and finished everything to a much higher standard than I could achieve. The positives of this have meant that I could crack on with the next phase of my bus.
 
Expensive way of learning that right people with the right tools do a better job than the ...... well you know what I am trying to say ;)

Compressor looks like a nice one though (hope it's not a Chinese one)
 
When I was cleaning up the arches I noticed the rear jacking points (edit NOT jacking points, they're fine, I meant to say seatbelt anchors) were not looking too clever and since I'm putting the original bench seats back in I wanted all the seatbelt anchors to be in good order. I also had a few holes to fill from an abandoned heater install and I wanted to build up a level of competence with my welding on the bus before moving on to next main job.

so cut out the old anchors and got on with it. The premade plates are from Schofields that were then extended.


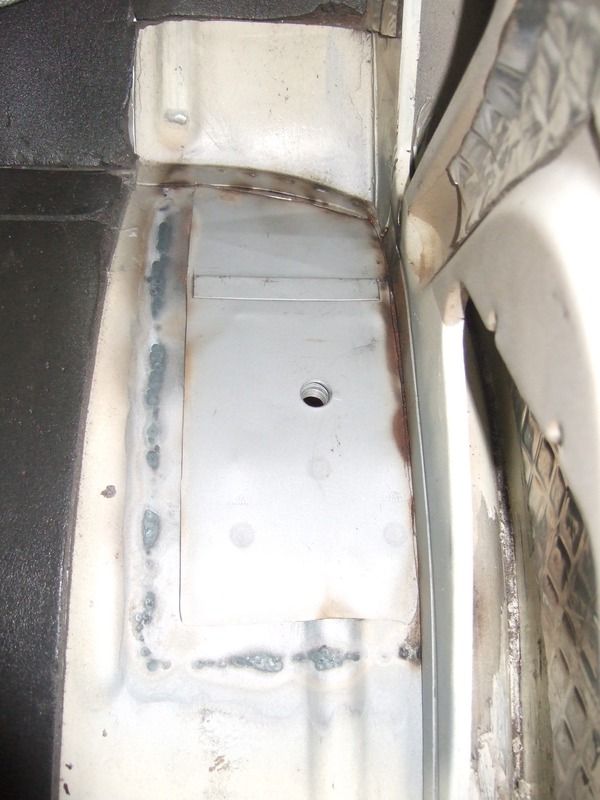
Quite happy with the results and it's all solid

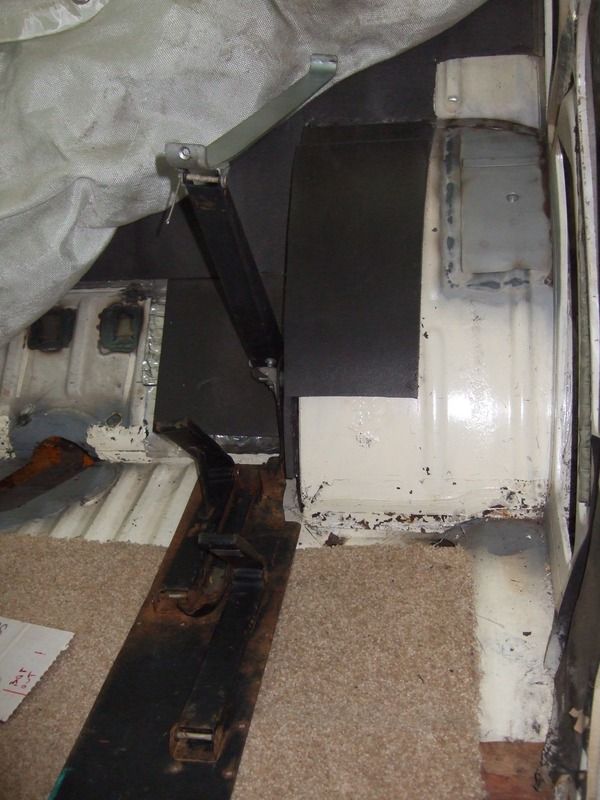
Next job was to tweek the engine support bar. My exhaust J-Tubes were banging on the bar as there was no clearance, not now.


The last image gives a hint of my next welding job.

PURISTS LOOK AWAY NOW!

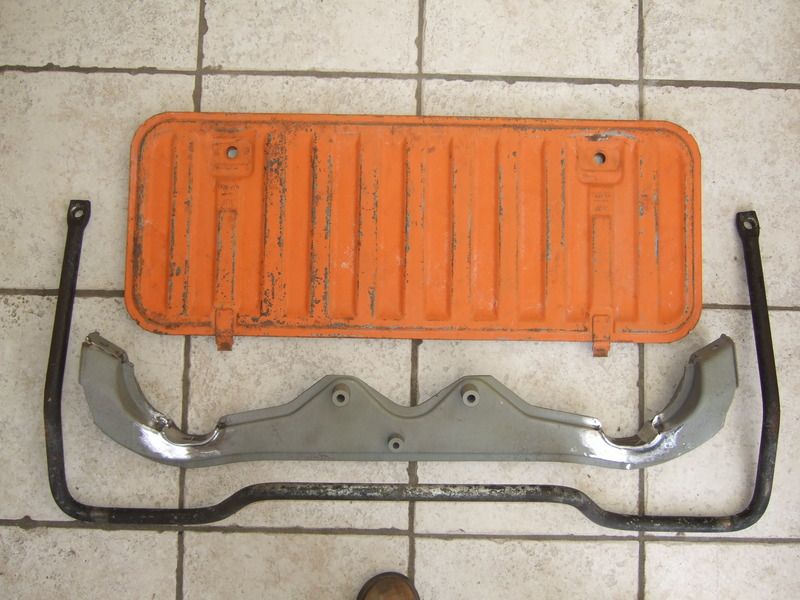
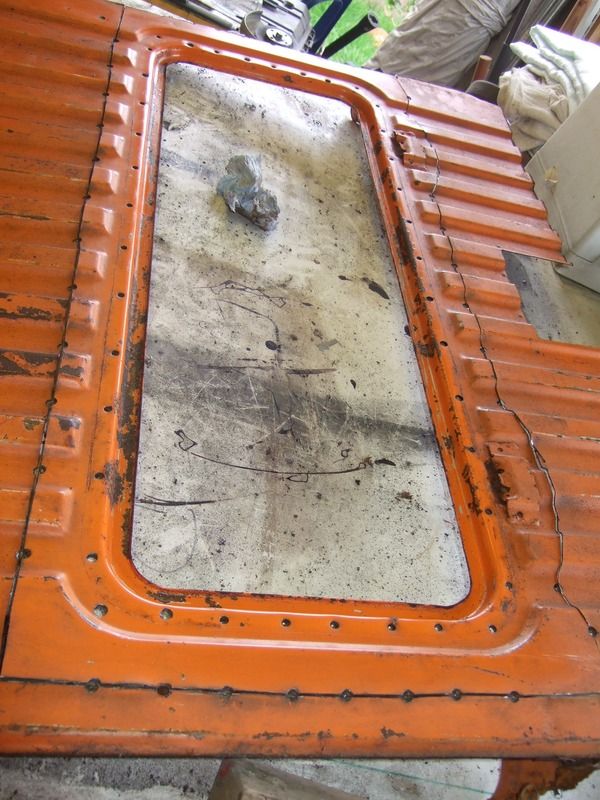
One of the things I love about the late bay (yes, I said it) is the great access to everything if you had a two litre model. Most of these came with an inspection hatch which I've always hankered after. So I found one from an EB member and got to work.

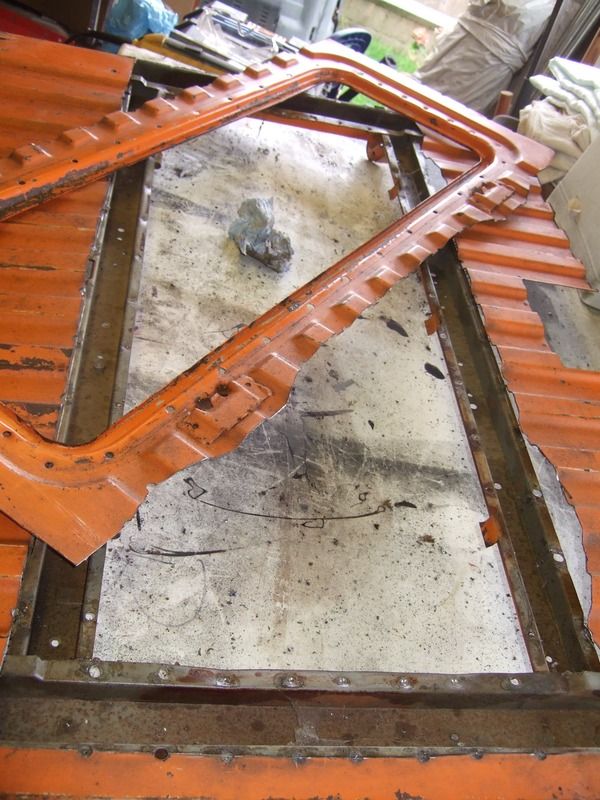
I bought pretty much the whole rear deck including the framework. I drilled out all the spot welds.


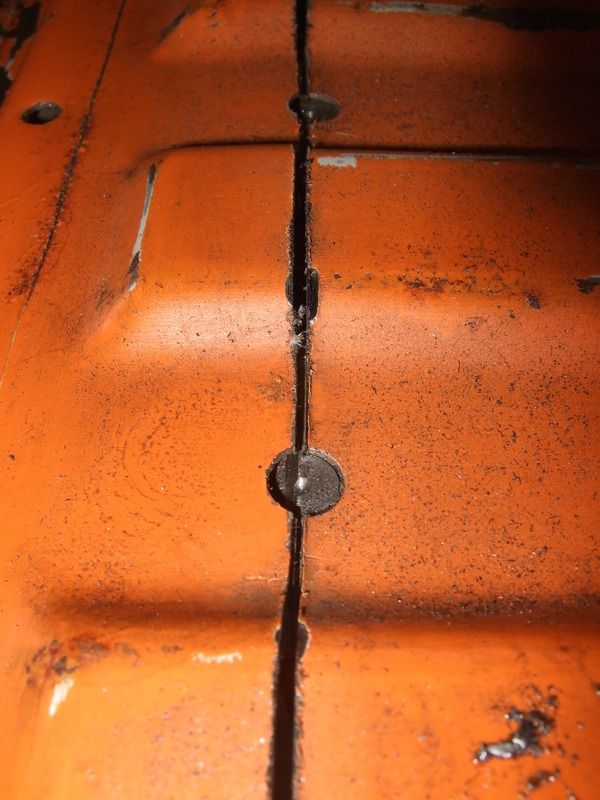
I started with 6mm spot weld drills but after taking no time to break two I moved on to 8mm. They are not cheap drill bits and I used cutting fluid too. 8mm is definitely the way to go but does require more work down the line. Perhaps more care and less pressure would have netted a better result. It's all down to experience I guess and I'm new to most of this.

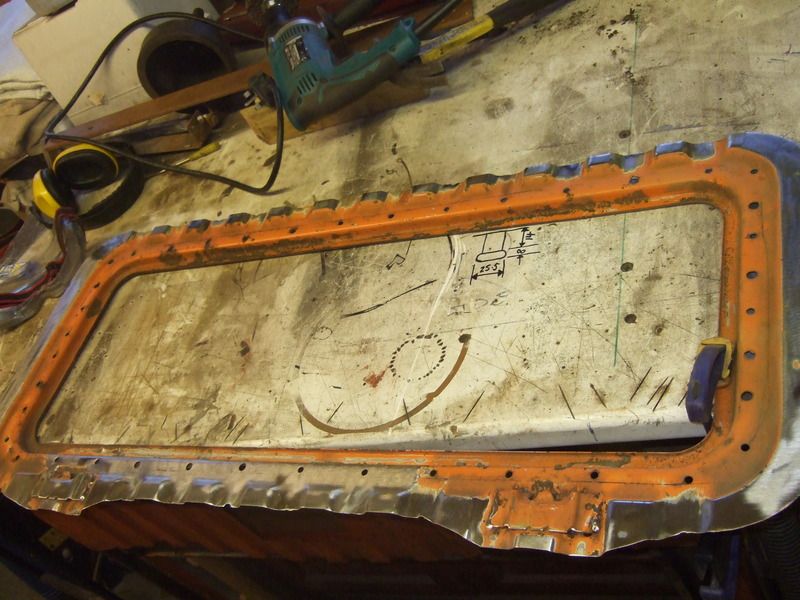
Cut through all the spots


and eventually got the bit I wanted. I've cut it so there is plenty to play with.


Get out!


Started to clean it all up


but couldn't get into some areas...


back to the blasters then?
 
gninnam said:
Expensive way of learning that right people with the right tools do a better job than the ...... well you know what I am trying to say ;)

Compressor looks like a nice one though (hope it's not a Chinese one)

Couldn't agree more. There's a reason that the tools the blasters use cost a small fortune. They do what they're designed to do.

The compressor is German (but I suspect via China). It wasn't expensive but better than most. I'm testing the water with this one.
 
Ah, that's better


Frame back from being blasted and a dust of zinc primer and back on.

Before I welded anything else I spent a long time practising and getting to know my welder. It's pretty good but has a lazy automatic setting. I wasn't feeling confident about using this setting and wanted to learn a bit more about what happens on manual mode.


One of the methods of welding thin plate steel I learnt on the course I did was to use a seam weld (I think that's what it is called). You have to have about 1mm of a gap in order for this to work well. This method is good as it introduces less heat into the metal and so less distortion.
The plate above was one of about three practises. This is when things actually started to work out well. I wrote down all my settings and recorded the outcome. Have to say I'm really glad I did, I've used my notes a lot already.

Right back to the install


Welded a simple bar reinforcement frame to the main frame. This was done to ensure no warping during welding and also to eliminate me damaging it as it was pretty flimsy for it's size. Finally I wanted to make sure when offering up to the back of the bus everything I was doing was consistent.

Marked out the frame in the back of the bus


and started to drill out the spots here.


Another check


Used a welding blanket to protect the paint in the engine bay before doing any cutting from above


and started to cut away the rear deck. I can't tell you how many times I measured but it took hours before I was happy to proceed


No going back now


Latest posts

Top