Inaccessible Battery Terminals?

Early Bay Forum

Help Support Early Bay Forum:

This site may earn a commission from merchant affiliate links, including eBay, Amazon, and others.

Granite

Active member
Supporting Member
Joined
Jun 21, 2022
Messages
35
Reaction score
23
Location
South London UK
Year of Your Van(s)
1970
Van Type
Camper
We've all moaned about the difficulty in accessing the battery terminals on our Type 2s. I got so fed up trying to get my head and arms into the engine compartment and at the same time reach the battery posts, that I finally decided to do something about it. The solution is very simple and does not cost too much. I purchased the following item from Amazon.
Delivered 8 December
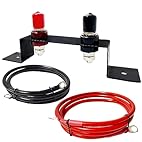
Battery Jump Post Kit Terminals Jumper Post Cable and Mounting Bracket Remote Battery Relocation Kit Starter Battery Charging Jump Post for UTV ATV Ca

It cost £39 and took about half an hour to fit. Mind you I had already fitted these terminals to the van. They make it so much easier to add cables. They were about £9 a year ago.
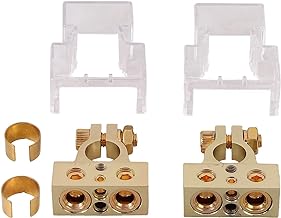
eSynic 2PCs Waterproof Car Battery Terminals 0/4/8/10 Gauge AWG Heavy-Duty Battery Terminal Connector Battery Terminals Ca...

eSynic 2PCs Waterproof Car Battery Terminals 0/4/8/10 Gauge AWG Heavy-Duty Battery Terminal Connector Battery Terminals Car Audio Battery Terminal Positive and Negative Set with Cover Pair Kit -Golden.​

The photos show the final result, instant easy access to the battery for jump-starting or charging..

Granite
 

Attachments

  • IMG_5209.jpeg
    IMG_5209.jpeg
    2 MB · Views: 7
  • IMG_5212.jpeg
    IMG_5212.jpeg
    2.7 MB · Views: 3
Last edited:
Reaching in there with a 13mm spanner isn’t that hard 🤨 besides how often do you need to disconnect the battery
 
Last edited:
If you're lucky, very rarely. But if I have a battery problem on the road, I'd rather not be squatting down trying to find the battery terminal whilst waiting for a car to rear-end me. Also, I'm not that mobile and anything that makes it easier to jump-start or attach my charger is fine with me.

There may be others like me. They can choose to take up my idea or not.
 
Got a "Discarnect" on the neg pole for rapid isolation if needed and quick releases on leisure battery. What with my recent headlight staying on issue and lack of new screen seal availability I have tucked van up in it's JK cover. Was only after rolling about on my damp drive attaching the belly straps that I remembered I hadn't isolated the main battery, - yes you guessed it you can't open engine lid with the straps done up - suddenly the idea of a rally car style external isolater holds more apeal. Need to clear my garage ASAP Rocky 🤔
 
I can’t see very clearly where your existing terminals are on the battery. Are they on the far side of the battery on the side closest to the bodywork ???
That’s how mine are right now because I’ve got the wrong battery in with the terminals close to the bodywork and you are spot on in that they’re a pain to get to easily but on mine that’s because I’ve got the wrong battery in there. I’ll use that battery as my leisure battery when I get around to it just for my diesel heater that I also haven’t fitted yet, then they’ll be the right way around with the terminals close to you and easy to get on. Then I can buy a new battery for the van the right way round. But right now, I’m still wrestling with these brakes, I find it impossible to believe that it’s still fighting me.

Ozziedog,,,,,,,,,,, off the road but at last it’s not summer :)
 
If one has a factory-standard, VW 1600 Type 2 with the oil-bath air cleaner and various 50 mm diameter flexible hoses, it's probably easier to access a battery mounted on the other side of the engine compartment. This is what we did in circa 1981/82, when we fitted a generic 60 Ah battery, instead of the specially sized & shaped battery to fit on the right-hand side which would be retained by the standard VW Type 2 pattern battery clamp, which clamps the bottom of the battery casing.

I used a much longer positive-supply cable, salvaged from a VW 411/412 Variant and a woven negative-supply cable salvaged from a Triumph Toledo/Dolomite. I fabricated a varnished, stepped plywood base, which bolted down using stainless-steel M6 machine screws, "penny-washers" & Nyloc nuts to the shaped battery-well and fastened galvanised, sheet-steel battery-retainers to the plywood, using stainless-steel M5 coutersunk machine screws, washers & Nyloc nuts.
 
Last edited:
Years back on my old 'late bay' I had a regular battery as a leisure battery and it was always a pleasure when I needed to jump start it, I just had to connect a positive to positive and away it went.
 
Years back on my old 'late bay' I had a regular battery as a leisure battery and it was always a pleasure when I needed to jump start it, I just had to connect a positive to positive and away it went.
I’ve got mine set up with a switch in the glove box (split charge) so I can jump start myself while sat in the front 😁
 
I’ve got mine set up with a switch in the glove box (split charge) so I can jump start myself while sat in the front 😁

I have long planned to do something similar, using a momentary push-button micro-switch on the steering column (on the opposite side to the ignition switch), to activate a solenoid (i.e. ultra heavy-duty relay) in the engine-compartment, of the same type that would be used with an inertia-type starter motor, to connect the supplementary battery into the starter circuit.
 
I have long planned to do something similar, using a momentary push-button micro-switch on the steering column (on the opposite side to the ignition switch), to activate a solenoid (i.e. ultra heavy-duty relay) in the engine-compartment, of the same type that would be used with an inertia-type starter motor, to connect the supplementary battery into the starter circuit.
That’s clever!
 
Reaching in there with a 13mm spanner isn’t that hard 🤨 besides how often do you need to disconnect the battery
Today I reached in with the 13mm spanner like you suggested. No good -turned out my yuasa battery had terminals which required 11mm spanner. That said reaching in their with a spanner isnt hard BUT getting in there to get to see what you get the spanner on the terminal nuts is another thing - not only that I ripped the sleeve on my shirt trying to manoeuvre about under the engine lid. Then I had to lift the 24 kg battery out from its seated position -that proved to be awkward with metal plates stopping an easy route out. So my new battery will have the connectors the right way round pos on left front and neg on right front.
 
Today I reached in with the 13mm spanner like you suggested. No good -turned out my yuasa battery had terminals which required 11mm spanner. That said reaching in their with a spanner isnt hard BUT getting in there to get to see what you get the spanner on the terminal nuts is another thing - not only that I ripped the sleeve on my shirt trying to manoeuvre about under the engine lid. Then I had to lift the 24 kg battery out from its seated position -that proved to be awkward with metal plates stopping an easy route out. So my new battery will have the connectors the right way round pos on left front and neg on right front.


I’ve got the same so that battery although good will be destined to a leisurely role once I get around to it. It’ll be around the right way then. it’s also on a rather large toooo doooo list.

Ozziedog,,,,,,,,always something. :)
 
I can’t see very clearly where your existing terminals are on the battery. Are they on the far side of the battery on the side closest to the bodywork ???
That’s how mine are right now because I’ve got the wrong battery in with the terminals close to the bodywork and you are spot on in that they’re a pain to get to easily but on mine that’s because I’ve got the wrong battery in there. I’ll use that battery as my leisure battery when I get around to it just for my diesel heater that I also haven’t fitted yet, then they’ll be the right way around with the terminals close to you and easy to get on. Then I can buy a new battery for the van the right way round. But right now, I’m still wrestling with these brakes, I find it impossible to believe that it’s still fighting me.

Ozziedog,,,,,,,,,,, off the road but at last it’s not summer :)
Sorry Mate,
I've not been on the computer for a while, hence the delay in responding. My terminals are on the back side of the battery next to the bodywork with the POS terminal towards the front of the van, Neg next to the rear light fitting, but even with a battery with terminals on the side facing the engine compartment its a pain in the backside to get crocodile clips onto the terminals. With my new terminals it is a piece of cake. I don't regret fitting them. The cost was around £45 in total and about an hour to fit. No more neck pains and muscle strains for me.

Granite
 
That’s clever!

If that doesn't work, I shall simply resort to cranking the engine over by hand, using the starting-handle facility that was retro-fitted in circa 1989; a facility that was factory-fitted to some vehicles, especially for the armed forces.

See the following magazine article featuring a military specification, 1968~71 VW 1600 Type 2, with Volkswagen factory-fitted, engine starting handle facility:

Paul Knight, Volksworld, June 2002, Pages 100~103.
Thanks Nigel, the link sadly doesn’t work.
My industrial engine had a hand crank and crank pulley, unfortunately it didn’t fit with the engine mount so I let it go.
 
Varta are great batteries
Varta batteries the E25 has 630 cold cranking amps so plenty for winter and importantly the positive pole is on the left front.

Battery EMF voltage and hence current, is a temperature dependent property, covered in the chemical thermodynamics section of physical chemistry. In short, the lower the temperature the lower the lower the EMF voltage.

In some of the colder climates, one could obtain mains-electric heating pads, to pre-heat the battery and pre-heat the engine oil, the latter of which I came across for a VW Type 1 style air-cooled engine, at the Volkswagen dealership in Västervick, Sweden, during our 1982 Summer motor-caravanning holiday.

I found when using Mobil 1, SAE 5W/50, API SF & SG, fully-synthetic engine-oil, that less cranking power was needed for cold-weather starting. Depressing the clutch pedal also helps to reduce the load.
 

Latest posts

Top