72 Westy Crossover Baltimore Resto - Bodyshop resto starts

Early Bay Forum

Help Support Early Bay Forum:

This site may earn a commission from merchant affiliate links, including eBay, Amazon, and others.
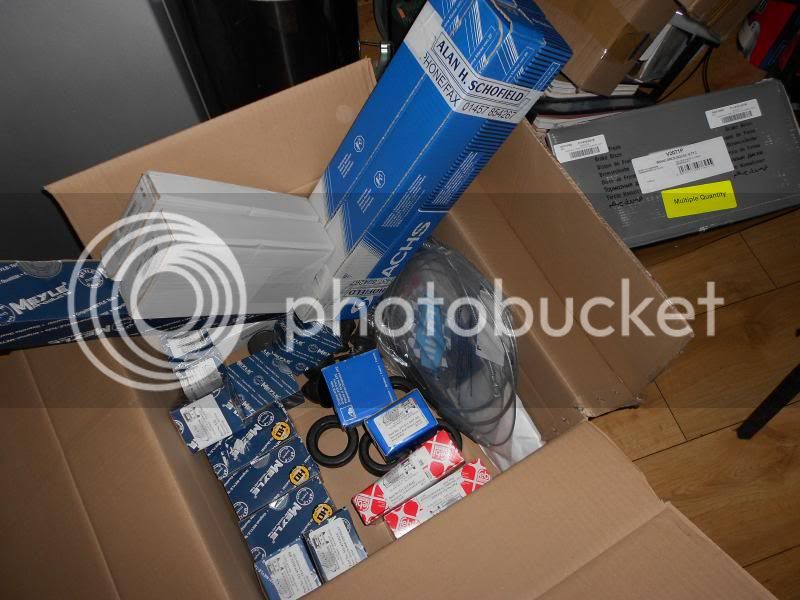
I persuaded Kev at he Bodyshop to tackle the cab floor as it wasn't major so it's there now. The trade off is that work stops on my 71, which is understandable. So today I picked up a big order from Schofields £600's worth, brakes, bearings, ball joints, shock absorbers etc.

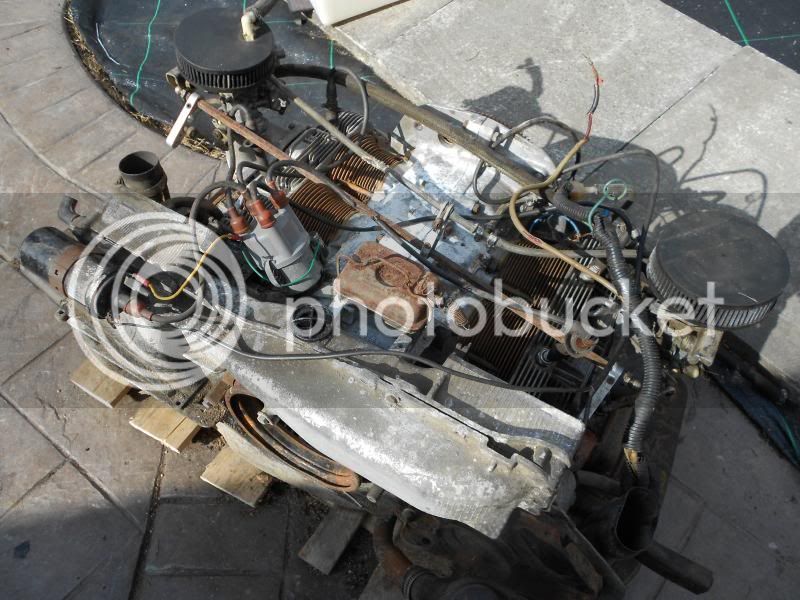
Then this afternoon I decided to check out the engine I've bought. It's a correct engine code Type 4 1700 CB code. I removed the tinware to have a good look and not surprisingly another old mouse nest...lol This engine came from the US like the van. Had to vacuum the mess up. Good news is it looks like it was loved at some point. Looks like it was rebuilt as some point, the oil looks golden, good plugs, points etc. The leads have been chewed by the mice though. So I'm quite hopefully it will be good enough for now to get it through the MOT.


Popped over tot he bodyshop today and some progress on the 72 welding. Cab floor nearly done and he's done a great job on the chassis in the engine bay which had been cut to fit an aircon pump.


My engine bay was cut in the corner the same as that too!!!
For the air con you reckon??

Hope your engine is good un!!!

Good luck!!
 
Lee C said:
My engine bay was cut in the corner the same as that too!!!
For the air con you reckon??

Hope your engine is good un!!!

Good luck!!

Pretty certain it's air con. They fit. Type 25 air con unit but means cutting. Mine was a bit of a bodge so the Bodyshop have made a good job. They are not making the raised section to marry up to the tinware.

Fingers crossed on the engine. I will be having a rebuild eventually but need it to be ok for the mot

Cheers
 
I started this weekend on recommissioning the van for eventually the MOT, which is a long way off yet. First is all the suspension, ball joints, wheel bearings and brakes. I'm also resetting the rear suspension whilst I've got everything stripped.

The van has almost certainly been standing for at least 10 years, so It didn't start well when the first rear brake hub would not come off the splines without use of an hub puller. So I was expecting many more problems along the way but everything else came off fine so quite pleased on progress although just when I had about finished for the day a slip using the ball joint splitter on the tie rods resulted in a nasty cut...whoops.

So all I need now is someone to press in the new ball joints for the torsion arms and the new wheel bearings, then a coat of black paint before reassembly.


Hi kev ,
Great work on the 72 , that chassis came up a treat !
Keep up the good work ,
BAZ
 
TEXASWESTY said:
Hi kev ,
Great work on the 72 , that chassis came up a treat !
Keep up the good work ,
BAZ

Thanks Barry. So pleased with it. It looks like a new van underneath

Cheers
 
All new ball joints, (torsion arms, new steering arms), Front and rear wheel bearings fitted, so today a coat of black epoxy chassis paint on the new disks, new brake hubs and suspension parts. Front calipers have been fully rebuilt with new pistons seals etc. by Bigg Red.

This was just after painting so stlll wet. They should dry satin like the front beam.


Holidays out of the way so back on to the 72. I had a friend at a local garage press in the new front torsion arm ball joints and rear wheel bearings. The front wheel bearings are easy as they are 2 peice. So new rear drums, brakes, disks & pads, shock absorbers, steering arms, rubber donuts etc. Cost a fortune. I started last weekend on the rear suspension adjusting +4 -4 splines to compensate for the sagging. Then this weekend was hoping to finish but was thwarted by being supplied late Bay front disks which are only 4mm deeper so didn’t notice till I came to fit doh. I also replaced the gear linkage shuttles and bush.
So hopefully I will have this done next weekend then need to make up all new brake pipes and fit the master cylinder.


Looks like quite a lot off the list has been ticked :D

Looking good :mrgreen:
 
Everything back on today, correct new disks, new steering arms, refurbished calipers and new pads. I also fitted a new master cylinder with new lower reservoir and hydraulic rubber hose from the top reservoir to the bottom replacing the horrible plastic pipe which always seems to leak and take the paint off. Fitted 4 new flexible brake pipes, so next job all new brake pipes which I'm making up myself.


Great work Kev , I hope the bits you grabbed off john at BUSFEST came in handy .
What's the spec / details on the hydrolic pipe used from brake reservoir ??
Cheers BAZ
 
TEXASWESTY said:
Great work Kev , I hope the bits you grabbed off john at BUSFEST came in handy .
What's the spec / details on the hydrolic pipe used from brake reservoir ??
Cheers BAZ

Thanks Barry.

I got the tip for the hose off here. See http://www.hoseworld.com/acatalog/EPDM_RUBBER_TUBING.html" onclick="window.open(this.href);return false;
 
Milestone reached this weekend, it now has brakes woohoo! I had a problem with the new master cylinder leaking supplied by one of the usual suspects, (you get what you pay for), so fitted a proper Made in Germany one from Schofields. I made up all my own brake pipes using a new Sykes Pickavant flaring tool which was spot on. Cost me £100 but quality tool.


Nice work on the brake pipes 8)
One of the many jobs on my list and not looking forward to it ;)
 

Latest posts

Top