reezvaan said:
waiting impatiently

The template has been updated, but I now need to pre-book the public library computer which has the document scanner. I hope to be able to do this on Wednesday.
Fabricating & Installing the Supplementary Headlamp Mounting Brackets
By measuring the right-hand (i.e. offside or starboard) and left-hand (i.e. nearside, port or larboard) bodywork headlamp shells (aka bowls), of a scrapped, British specification, 1974 VW 1800 Type 2 and the positions of its various mounting brackets, for the 1974~79 VW Type 2 pattern headlamp units and trim rings, I was able to fabricate a cardboard template.
This template summarises all the required location data, for the three headlamp-unit fixing points, relative to the rims of the bodywork headlamp shells and the existing trim-ring's fixing point; which is identical for both the right-hand and left-hand sides.
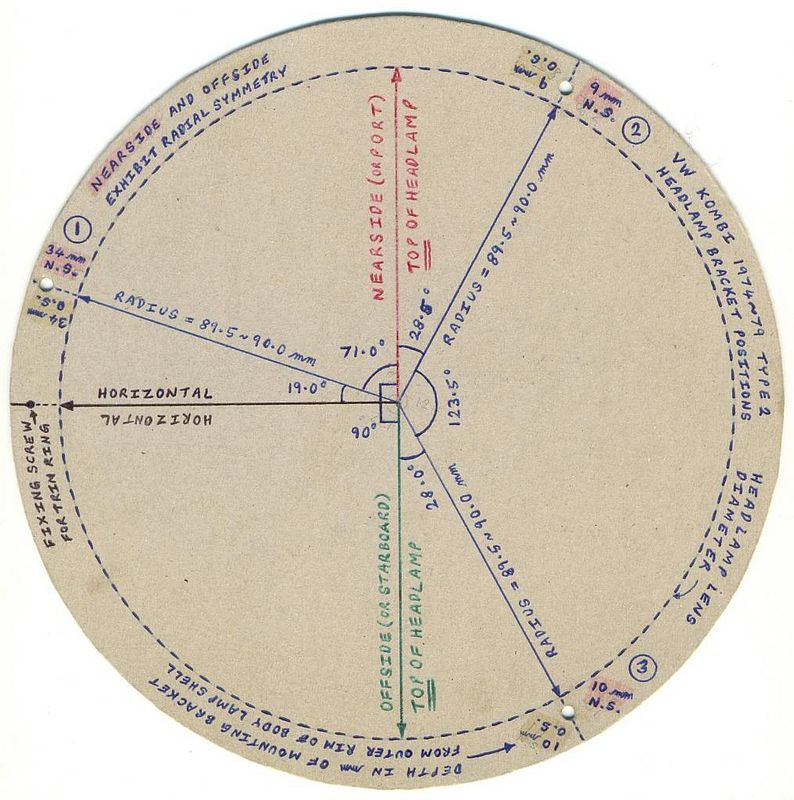
The 217 mm external diameter of the template, corresponds to the 217 mm external diameter of the headlamp unit's nominally circular (with various cut-outs) mounting ring.
The 179 mm diameter (i.e. 2 x 89•5 mm radius) inscribed blue dotted-line circle, corresponds to the outer circumference, of the lamp-unit's glass lens.
Three 4 mm diameter holes, are punched in the cardboard, corresponding to the required mounting-hole centres, in the headlamp unit's nominally circular (with variously shaped peripheral cut-outs) mounting ring. The mounting ring also has other holes, which will not be used for the VW Type 2 installation.
Using the headlamp trim-ring's fixing point, as a point of reference which defines a horizontal line to the headlamp lens centre, the locations of the headlamp-unit mounting brackets and their captive-nut centres, are as follows:
(1) Recessed 34 mm in from the lamp shell rim and 9 mm outboard of the lamp lens periphery. Rotated 19 degrees
clockwise, from the trim-ring's fixing point.
(2) Recessed 9 mm (i.e. within 9½ ± ½ mm) in from the lamp shell rim and 5½ mm outboard of the lamp lens periphery. Rotated
118½ degrees (i.e. 90 + 28½ degrees = 19 + 71 + 28½ degrees)
clockwise, from the trim-ring's fixing point.
(2) Recessed 10 mm (i.e. within 9½ ± ½ mm) in from the lamp shell rim and 5 mm outboard of the lamp lens periphery. Rotated 242 degrees (i.e. 19 + 71 + 28½ + 123½ degrees)
clockwise, from the trim-ring's fixing point
OR rotated
118 degrees (i.e. 90 + 28 degrees)
anticlockwise, from the trim-ring's fixing point.
For the moment, I don't have time to examine my L-shaped, headlamp-mounting brackets in-situ and it's been many years since I installed them, so my memory is a little hazy, with regard to the exact procedure I adopted. I shall try to examine them in the near future and also draw some sketches, to help explain the various piecemeal stages, of positioning & securing the mounting brackets, plus the required locations of their fixing holes & captive M4 nuts for the headlamps.
Using scrap off-cuts, of 25 mm thin-walled (circa 1 mm) square-section tube, the L-shaped, headlamp-mounting brackets, were fabricated by first cutting off circa 25 mm and 30 long sections and then cutting across the square-section diagonal. These were then trimmed and shaped to suit their individual locations; the details of which I didn't record, but can check shapes and dimensions when I have sufficient time to spare.
Cursory examination of my L-shaped, headlamp-mounting brackets, has revealed that the material is nominally 1•0 mm thick. The other dimensions of the brackets, vary according to installation position, which are as follows.
(1) -
Upright height 12 mm | width 30 mm |
Leg length 20 mm |
Leg towards headlamp-shell rim
(2) -
Upright height 12 mm | width 25 mm |
Leg length 15 mm |
Leg away from headlamp-shell rim
(3) -
Upright height 12 mm | width 25 mm |
Leg length 15 mm |
Leg away from headlamp-shell rim
My design choice re bracket width, was related to bracket strength, plus the security & stability of the lamp units.
Note that neither the Legs nor the Uprights, are rectangular in shape, being profiled to accommodate the shape of the headlamp unit's nominally circular (with variously shaped peripheral cut-outs) mounting ring.
Note that the bracket widths of 25 mm and 30 mm, were my own design, the original brackets on the 1974 VW 1800 Type 2, from which I took positional measurements, were much smaller.
Owing to the curvature of the body headlamp shell, it is necessary to slightly bend the L-shaped sections, to more or less than 90 degrees, dependent upon whether the orientation of the
Leg, is towards or away from the rim.
Positioning the brackets within the body headlamp shell, needs to be done in stages, to ensure that each set of three brackets, are properly aligned in the plane of the headlamp unit's nominally circular (with variously shaped peripheral cut-outs) mounting ring, and that the 4 mm fixing holes in the brackets, coincide with those in the mounting ring to within acceptable tolerances.
The
Legs fasten to the body headlamp shell, whilst the
Uprights provide the fixing points for headlamp unit's nominally circular (with variously shaped peripheral cut-outs) mounting ring.
Drill a small hole in the centre of the
Legs, of all six L-shaped brackets. These will be used to fasten (either temporarily or permanently; dependent upon your preference!?!) the L-shaped brackets to the body headlamp shells. The diameter of these holes, will depend upon the diameter of fastening screws one has available, but I would suggest circa 3~4 mm.
TO BE CONTINUED!


